Blade Electron MkV Electric Vehicle work log

I do a decent amount of work at the space on my Electric Vehicle, a Blade Electron MkV/R on which I did a show-and-tell in May. I thought I should start documenting this work somewhere partly for my own records and partly for others to see, so Iā€™ve been photographing stuff to upload here at a later date. Today is that day!

My battery management system (an Orion BMS) was reporting that one of my cells was on its way out, claiming it could only store 50% of its rated capacity. I wanted to eliminate all other causes before I blindly replaced it. I knew the BMS was likely correct that something was wrong, but I wanted a second opinion (and more information to help work out if it just died naturally or something else killed it). The BMS samples at only 10Hz and I wanted something a little quicker to check for voltage spikes, and by spike I mean 0.5V above normal. I tried using an oscilloscope but we have no logging oscilloscopes at the space beyond a trigger logger and I couldnā€™t get the trigger to work at such a fine level, no battery-powered oscilloscopes so I wouldā€™ve needed a 240V inverter, and hacking together some longer probes so theyā€™d reach from inside the car to the battery terminals didnā€™t work. So instead I used an Arduino with xoscillo connected to my laptop, which let me sample & record with 8-bit/0.02V resolution at 59KHz. Good enough given the low cost of $0 in parts I didnā€™t already have.

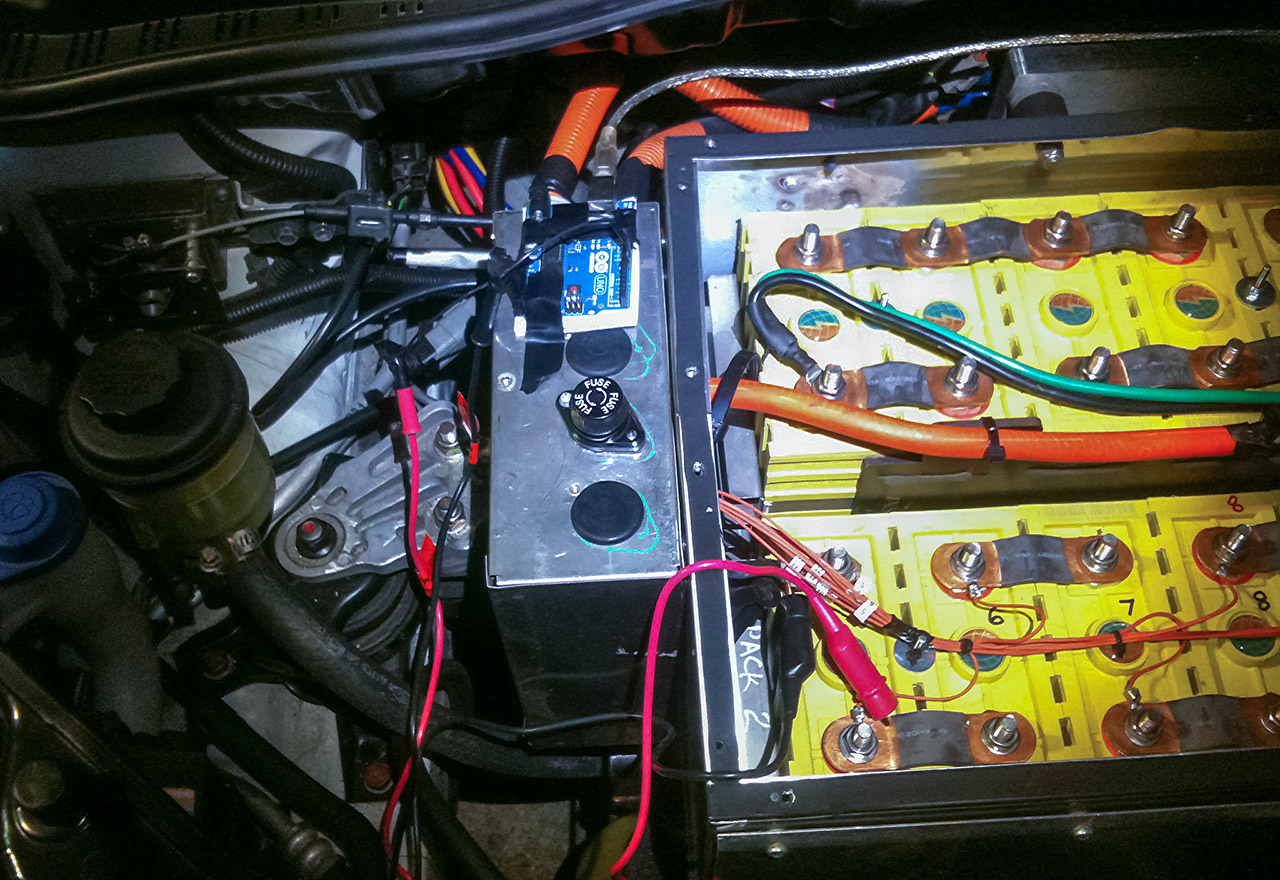
Arduino taped to the relay box, probes connected to cell 41 in the lower left. This is also what I was doing in Geek Shirt #27!

I went for a drive with @theban who helped record the data while I thrashed the motor. Analysing the 7.9 million data points we recorded, I determined two things:

  1. the battery isnā€™t as dead as the BMS said, but it is definitely weaker than the other cells. BMS was wrong as I expected, but not completely wrong.
  2. Thereā€™s some high-frequency ringing on the voltage heading into the battery, and constant voltage oscillations would shorten the batteryā€™s lifespan. This is the first cell attached to the cable that connects the front battery bank to the rear battery bank. Such a thick cable thatā€™s fairly long carrying so much electricity at constantly-changing rates, thereā€™s likely some eddy currents being induced. This seems like the most plausible explanation for the curves on the graphs.

Solution: my BMS can actually use the sensor wires to correct for part of this by shunting around voltages and I can add some filtering components, but itā€™ll take a lot of calibration to get it perfect. And itā€™s best to start with all cells equal. Just in case one of them died, I keep a spare Lithium battery from the same manufacturing run in the car so itā€™ll be exposed to the same conditions as the other batteries and drop-in compatible, but without any cycling itā€™ll always be healthy. So itā€™s time to swap some cells!

2 Likes

The plan was to remove the battery pack, reorder the cells and put it back together. Easier said than done, however eventually I managed to remove the front pack with @Boo 's help. At this point I should say that you shouldnā€™t treat these batteries like you treat AA batteries or even like you treat Lithium pouches for a quadcopter, because dropping one would be catastrophically bad. Be VERY careful handling Lithium batteries this size and try not to carry them by hand. Dropping them the wrong way even a few centimetres onto concrete could be enough to make them explode. I accidentally managed to short out two of the fifty-six cells in my car while trying to remove a stuck clip with my metal-wrapped-in-electrical-tape pliers. Itā€™s hard to say how much power passed through the tool in my hand but going by the amount of metal I instantly converted to plasma on the tool & the bolt, plus the fact that the explosion threw me back a little, I estimate it around 30-60kW of electricity. It took almost two weeks for my hand to fully heal and that was a minor incident, so I say again - BE INCREDIBLY CAREFUL WHEN HANDLING LITHIUM BATTERIES OF THIS SIZE. You literally cannot be too cautious. :stuck_out_tongue:

Front battery pack of 8 cells removed. Bad cell on the left, hot spare on the right.

The ā€œkinda-badā€ cell, a Thundersky LiFeYPO4 90Ah 3.3V weighing 3.2kg, serial code TS-LFP90AHA 101208-F26391. This baby will power a 3.3V microchip for a month or more. Donā€™t know how much capacity it still has but I know itā€™s at least 70Ah.

Now to put them back inā€¦ For a large part of this process I was by myself. Itā€™s a precision drop to lower them into place and it turns out I have to remove the other pack before I can put this one back in. How on earth am I going to do this by myself? HSBNE hoist to the rescue! :smiley:

Removing the second battery bank with our hoist. Certainly a sight you donā€™t see every day.

At HSBNE, you can even do stuff like this by yourself! :smiley:

After a few hours swearing and playing the most expensive, most dangerous game of Tetris Iā€™ve ever played in my life, the packs were both back in the car.

I didnā€™t take any photos of me putting in the first pack, but this is the second one finally lined up and going in.

Almost there!

I connected all the HV & sensor wires to the packs and everything worked first time! Good thing, because if something doesnā€™t work then itā€™s likely to go very badly - double-check everything before you do it. I reset the current-limiting safety trips in the BMS and Iā€™ve been fiddling with its settings to compensate for the cable. Things are already much better, but itā€™ll probably take me a few months of fine-tuning until Iā€™ve got the properties of this cable completely modelled & compensated for. End result: the carā€™s range is now back to where it used to be!

1 Like

Iā€™ve been doing more than one thing to try and improve the carā€™s range. The easy way would be to just by more cells, but I like a challenge. One of the many ways you can improve any carā€™s fuel efficiency (while increasing its power and raising its top speed) is by reducing two things - its rolling resistance and its drag coefficient. Rolling resistance is already very low in this car because the engine can spin freely when coasting and the tyres are Nitrogen-filled, low-rolling-resistance tyres inflated to a slightly higher than usual pressure. I still have a few ideas of ways I can reduce the carā€™s rolling resistance, but for now Iā€™ve been focusing on the carā€™s drag coefficient.

The car was manufactured and was first road-registered by Blade Electric Vehicles, but the donor body was a 2010/2011 Hyundai Getz bought straight from Hyundai before it had been registered. Legally speaking itā€™s a standalone vehicle that shares a lot of its parts with a Getz, but mechanically speaking itā€™s a conversion of an existing vehicle. The later model Getz already has a pretty good aerodynamic profile but thereā€™s a few areas that can be improved on almost any car, and a big one is the wheels.

Fun fact - the wheels themselves are responsible for anywhere between 5-30% of a compact carā€™s aerodynamic drag, creating huge amounts of turbulence that disrupts the laminar flow around the vehicle! Hubcaps arenā€™t always just aesthetic, some of them are designed to optimise aerodynamics. The problem is, aside from aesthetic hubcaps where ā€œoptimalā€ is just whatā€™s currently in fashion, the real-world ā€œoptimalā€ design is a trade-off between optimising for aerodynamics with a perfectly flat surface and interrupting the airflow to redirect some of it towards the brakes. If the brakes donā€™t have air flowing over them, theyā€™ll overheat and wonā€™t work as well. No one would want their brakes to stop working, thus hubcaps have air holes. Also, unless your car has mirror-image hubcaps on the left & right sides, theyā€™ve prioritised aesthetics at least a little over aerodynamics.

However, the main way of braking in this vehicle is the regenerative braking. This can capture up to ~16kW of power from the wheels to put back into the batteries. The brakes arenā€™t used much, except for when you need to stop quickly or to keep the vehicle from slowly rolling at traffic lights. The brakes may not get too hot with sealed hubcapsā€¦ But thereā€™s only one way to find out! Tape up the wheels, drive it hard for a few days and see how it goes.

Clear tape so it looks less obvious and less like a rundown rust bucket when Iā€™m driving around normally.

Results from this experiment - the brake pads are fine and even sealed up like this, theyā€™re still way cooler than the average carā€™s brake pads. Time to make it permanent and more aesthetic!

Back in the 50s & 60s, cars frequently had what are called ā€œMoon wheelsā€. These are basically solid, chrome mirror-finished hubcaps, often with ripples or other accents, sometimes covering the whole wheel but frequently covering only a small area in the middle (ā€œbaby moonsā€). Cars in the 50s & 60s also used drum brakes which were much more prone to overheating than todayā€™s disc brakes. Guess what frequently happened back then.

I wasnā€™t a fan of the retro polished mirror finish, but I liked the idea of someone else doing the machining for me. A few emails later, I had arranged an order for some epoxy-coated brushed metal press-on hubs at a size to match the EVā€™s tyres. Stainless Steel ones like this are easier & cheaper to obtain but I wanted spun Aluminium to keep the wheel weight as low as possible. Which I find extra amusing, given my affinity for Stainless Steel with my DeLorean. :stuck_out_tongue:

I may be biased, but I think these look absolutely gorgeous.

And when the light hits them juuust right, they light up like a Silmaril.

Fitting them took me a few weeks to fit them all make sure everything was right. Pro tip - use foam tape to pad out the hub (especially the wheel balance weight) or else itā€™ll make a clicking noise as the hub wobbles & contacts the wheel balance weight, particularly at high speed. Geek Shirt #28 was me fitting these hubs, posing with a sword because they look a little like Captain America shields. I donā€™t know why. Itā€™s not like Captain America uses a sword or anything but it seemed like a good idea at the time.

Hubs all replaced

I think they look totally scifi.

I drove around the roads near HSBNE and monitored how many amps were needed to maintain travel at certain speeds, and I also monitored the energy consumption for daily driving over repeatable routes. End result: around 4%-6% more range, depending on how fast Iā€™m driving. Just by swapping the hubcaps! Totally worth it. :slight_smile:

1 Like

Just a small bit of work this update. The original car body was a 5-seater, but with the added weight of the batteries it was turned into a 4-seater so it remained within the vehicleā€™s designed maximum weight limit. This was done by removing the rear middle seatā€™s headrest, seatbelt & installing a foam block.

The custom upholstered foam does block make a good arm-wrest for kids. And it stops ā€œyouā€™re on my sideā€ arguments, too!

Thatā€™s all well and good, but that foam block meant I couldnā€™t fold the seats down since it was in the way. Which also meant I couldnā€™t fold the seats up for even more storage room. Nor could I even lay something flat across the back seat. That foam bump was always getting in the way. So, I removed it!

Seats out of the car. Itā€™s amazing how much space there is in here! Enough to fit two dead bodiesā€¦ because three would exceed the designed maximum weight limit. :wink:

Geek Shirt #32 happened here too.

The reason why I had to remove the entire rear seat - the foam block wasnā€™t just stuck on top, it was affixed to this board placed underneath the upholstery.

Removed at last! Youā€™ll never annoy me again

All back together. Now that the seats can fold, Iā€™ll have so much room for activities!

One final thing - the upholstery foam is cream-coloured while the seat fabric is dark grey, so I placed some black electrical tape inside the holes to make them less noticeable. Black on dark grey stands out less than cream on dark grey. Iā€™ve ordered some caps to finish this part off properly so it looks nice, but for now the increased utility is certainly welcome!

1 Like

Summerā€™s rapidly approaching and things are heating up. The Blade has air-conditioning but itā€™s not very cold. Everything in the air-con setup is a stock Getz system except for the compressor, which was swapped with an all-electric version that runs off the 12V battery bank. I was hoping there was some way to make it work better - both so I donā€™t boil in the hot summer sun and to save electricity. And Iā€™m game enough to hack something together if it would make it 20% cooler.

First, a quick primer on air-conditioning systems if you donā€™t know how they work! Gases heat up when they contract and cool down when they expand. Using this theory, a compressor is used to compress the refrigerant gas on the hot side, raising its temperature. Itā€™s then pumped through a condenser (basically a special name for a radiator in this scenario), to cool it down to ambient temperatures. It then passes through an expansion valve which lowers the pressure, and this drops the temperature of the cold side below ambient. A fan blows cool air past the evaporator (also basically a special name for a radiator in this scenario), cooling inside the car, before heading back to the compresor. Hereā€™s a simplified diagram.

After investigating various possible upgrades & optimisations, I noticed that thereā€™s huge gaps between the cooling fans, the condenser and the car body. The 5cm gap between the car body and the condenser is a design choice in the original Getz body (few cars have this area completely sealed so it can act as a bypass for excess air during high-speed driving and to decrease the likelihood of overheating & cooling fan failure if a rogue plastic bag blocks your front air intake). However the 3cm gap between the condenser and the cooling fans isnā€™t good and thatā€™s something specific to this electric-converted car. The original engineā€™s radiator used to go here to seal that hole, but since the radiator was removed this left a 3cm thick gap between the fans and the condenser. The cooling fan was likely sucking a lot of air through this gap, not through the condenser.

To seal this gap I applied some high-temperature foil tape over the gap between the fan and the condenser. I also sealed most of the gap between the condenser and the car body with an attempt at an origami one-way valve. This is so if thereā€™s positive pressure in front of the condenser (eg high-speed driving pushing a lot of air through the front air intake) then the excess air can enter the engine compartment without over-driving the cooling fans, but when thereā€™s negative pressure in front of the condenser (eg while youā€™re stationary and the fan is operating), it must pull air from outside. But just in case the folded bypass valve fails, a blocked front air intake isnā€™t a death sentence for this car, plus even if it happened then the foil tape I used is pretty thin & will easily split if the pressure difference is too high. Itā€™s hard to take a photo of this area but hereā€™s my best attempt.

Curses! Foiled again!

This means a few things:

  1. The cooling fanā€™s airflow is no longer short-circuiting by bypassing the hot condenser because all air pulled by the fan must now pass through the condenser
  2. All air pulled via the cooling fan must be fresh cool air that comes through the front air intake, it cannot suck hot air past the condenser a second time
  3. When driving, more of the air entering the front air intake will pass through the condenser, slightly increasing the natural airflow past the condenser

So, did this modification pay off? Previously when you set the air-con to its coldest setting, the compressor was running flat-out all the time. I never ever heard the compressor cycle on & off at the coldest setting, even the few times I tried it in winter. But now, not only does the air-con blow noticeably colder but the compressor cycles on & off - even on a 28ā€™C day after the car was left parked in direct sun for 8 hours! I thought about measuring the difference in a proper ABA test to make sure the improvement was real, but just the fact that the compressor now cycles is proof that itā€™s not only running colder, but itā€™s saving electricity too. Definitely a win-win outcome! :smiley:

2 Likes

As the year progresses and the weather gets even hotter, I thought about more ways to take some strain off the carā€™s air-con system. It now works well enough to keep you cool when driving around, but if the carā€™s left in the sun for a few hours then it takes a good 10 minutes to cool the car down even though itā€™s blasting very cold air out the vents. Being the thermal energy efficiency guy I am, this is a classic indication of thermal mass lag!

Thermal mass is how much thermal energy an object can store, or how much energy it takes to raise or lower its temperature. Think about how a stone left in the sun is still hot for hours after sunset, but a wooden fence cools down much quicker. In summer in Brisbane, the sun blasts energy at us at over a kilowatt of energy per square metre - for comparison of just how much energy that is, imagine a hair dryer every square metre! When the carā€™s left parked in direct sunlight, the internal air quickly raises to almost 60ā€™C. This in itself is pretty hot but the real problem is that after a few hours the entire rest of the carā€™s internals (seats, dash, doors, everything) all raise to 60ā€™C too. They all have to be cooled down first before youā€™ll be comfortable in the car, and all these solid objects have a lot more thermal mass than just the interior air.

Assuming you canā€™t just park in the shade, thereā€™s a few easy ways to help eliminate this heat accumulation - tint your windows with a high-performance window tint that blocks the non-visible spectrum too (my car already has this), leave your windows down a crack (up to 5cm is legal in QLD but this could make your car a larger theft target & you never want to do this without checking the weather radar first), or try to stop the sunā€™s energy from entering the car. White-coloured body panels help, taking off your headliner & installing some insulation also helps if youā€™re feeling adventurous, but that step wonā€™t do much with all the glass windows around that you canā€™t insulate. So I decided to do something about the glass!

Regular clear glass has thermal insulation properties only slightly better than a sheet of paper - so much so that 90% of its insulation properties actually come from the film of still air either side of the glass. A windshield reflector can reflect an awful lot of heat and I totally recommend them. I used to have a standard off-the-shelf one for this car, but me being me, I wanted to turn it up to 11.

Thereā€™s something shady going on hereā€¦

Presenting one custom-made windshield reflector with an almost perfect fit (even a small hole for the rear-view mirror, not just a cut-out rectangle)! This is made of 5mm-thick closed-cell foam with a low-emissivity reflective foil on either side. Thereā€™s a seam in the middle because the Getz windshield is so large itā€™s difficult/expensive to source insulating material that long so two pieces have been sewn together. The fitā€™s so good thereā€™s only around a half-centimetre gap/excess around the shade.

Even though it stays in place by itself, to make it even easier to install & stay in place, two metal rods were sewn into the sides of the sunshade. Magnets were glued to the body frame in matching positions. Now it snaps in place perfectly every time.


Hidden magnets, how do they work?

End result - as expected the interior air temperatureā€™s rate of increase & peak have dropped, the thermal mass temperature inside the carā€™s rate of increase & peak have dropped, and the air-conditioning now cools the car to a comfortable level much quicker. Iā€™ve also noticed that when the shade is up, inside the car is so dark you can barely see anything because the only way the inside is illuminated is via a tinted side window, and you can only see the inside via another tinted side window. Itā€™s weird but it makes the windows look like theyā€™re a much darker tint, almost solid black, and youā€™d have trouble making out even an obvious laptop sitting on a passenger seat. Thatā€™s an unexpected privacy boost!

1 Like

Have you looked into different AC refrigerants at all? Iā€™ve been reading that you can get hydrocarbon based gasses now (Hychill Minus30 is one of them), apparently supposed to be much better at cooling than R134a, the downside being that youā€™d need to take it to a shop for a full evacuation, flush and re-gasā€¦

Should make a wiki post about it :wink: