An Android TV stick is a miniture computer worth around $70 that is the size of a Credit Card and plugs directly into your TVs HDMI port. It can easily handle playback of 1080P MKV files either via wireless streaming or USB drive. Turn your dumb TV into a media centre.
Thse micro PCs run the Android operating system on pretty advanced hardware considering the size. Typically they are coupled with your favourite media management software like Kodi (XBMC) or Plex. There are many manufacturers of Android TV sticks but for this build log I’m going to be focusing on the CX919 which is based on the RK3188 Rockchip chipset.
Hardware :

Chipset	RK3188
CPU	Cortex A9
Processor Frequency	1.6 GHz
GPU	4 x mali 400, 500MHz
Memory	DDR3 2GB
Storage	8GB
Wireless B/G/N (AP6210 Chip)
Bluetooth - For mouse and Keyboard or remote control.
1x USB port.
Power draw of 700ma at 5V


I chose the CX919 hardware due to having a good amount of support documentation available online. Please note that the CX919 comes in flavors with different chips like the RK3188T - The T indicates that the chip cannot be overclocked as much but an RK3188T chip will still work with the infor below as far as I know. For more info please see [http://forum.xda-developers.com/hardware-hacking/android-sticks/1-6ghz-quad-core-rockchip-cpu-rk3188t-t2821662]. For this build log I'm only focusing on the chipset RK3188.
These units can be purchased from Geekbuying, Aliexpress or DX.com for around $60 to $80 USD delivered.
I purchased my unit from aud.dx.com - [http://aud.dx.com/product/cx-919-rk3188-quad-core-arm-cortex-a9-1-6ghz-android-4-1-1-tv-box-w-bluetooth-black-us-plug-961217792]

For more information on the general chipset RK3188 hardware please see : [http://www.freaktab.com/forumdisplay.php?134-RK3188-Devices]
For more information on the specific model CX919 hardware please see : [http://www.freaktab.com/forumdisplay.php?137-Measy-amp-CX-TV-Players]
Software :
I chose to run Android 4.4.2 Kitkat
The software for an Android TV stick consists of two main parts. The Kernel and the ROM. The ROM is the Android software package and visual OS while the kernel is more low level. Kernels will control the hardware of the unit like wifi chipsets, CPU overclocking, Graphic and Ram overclocking and similar.
After testing many roms on this unit I found the one that works best was a combination developed by a user called Finless.
Installation instructions can be found here : [http://www.freaktab.com/showthread.php?9389-NEW-Finless-ROM-2-0-KitKat-4-4-2-for-AP6210-wifi-BETA]
1) Download your kernel from [http://www.freak-tab.de/finless/kitkat_oc_kernels.zip] (188 megs)
2) Download your ROM from [http://www.freak-tab.de/finless/ap6210_kitkat_finless20_beta2.zip] (289 megs)
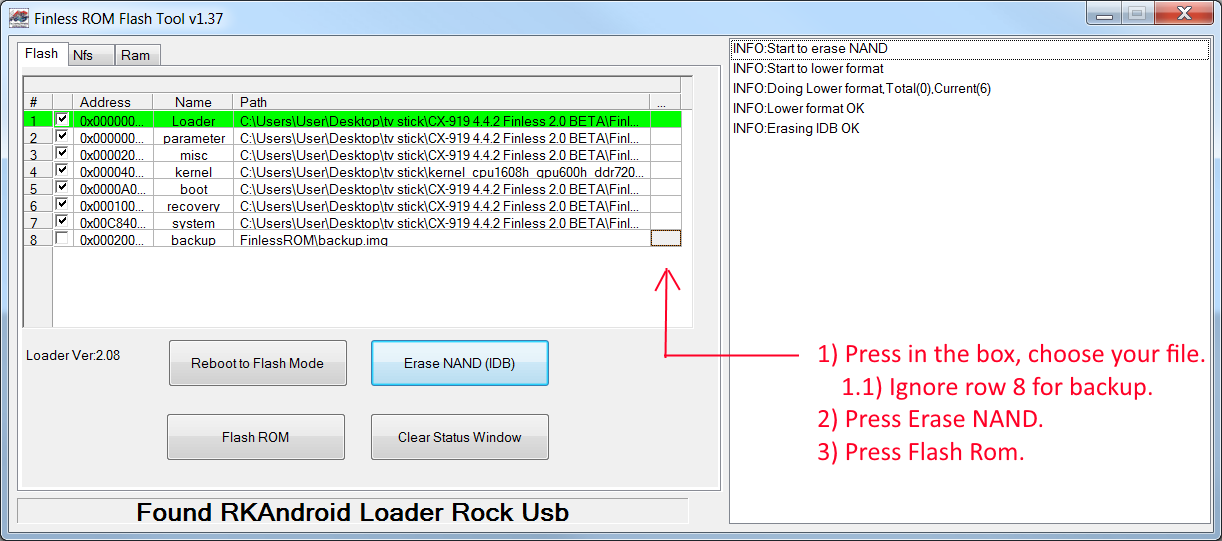
2.1) Download the new parameter files for 2GB and 6GB devices from [https://drive.google.com/file/d/0B9BFwCzfMWZ8QW5fUXJ5b1NONW8/edit?usp=sharing] and use this when flashing your unit. Use the 6GB parameter file for the 8GB CX919 device.
3) Download RK Driver Assist and install it on your windows PC. [https://www.dropbox.com/s/t7n5l0oca5m17ao/RK_DriverAssitant.zip?dl=0][2]
4) Press and hold the little button near the HDMI port on the device while plugging it in to the micro USB connector at the end of the device. Release the button around 3 seconds after plugging in the USB or once you hear windows make the sound it has been connected/detected by your PC.
5) I used the kernel kernel_cpu1608h_gpu600h_ddr720.img with good results. More info to come soon regarding flashing the ROM and Kernel - For the time being follow the instructions in the readme file in the ROM archive.
Hardware Mods :
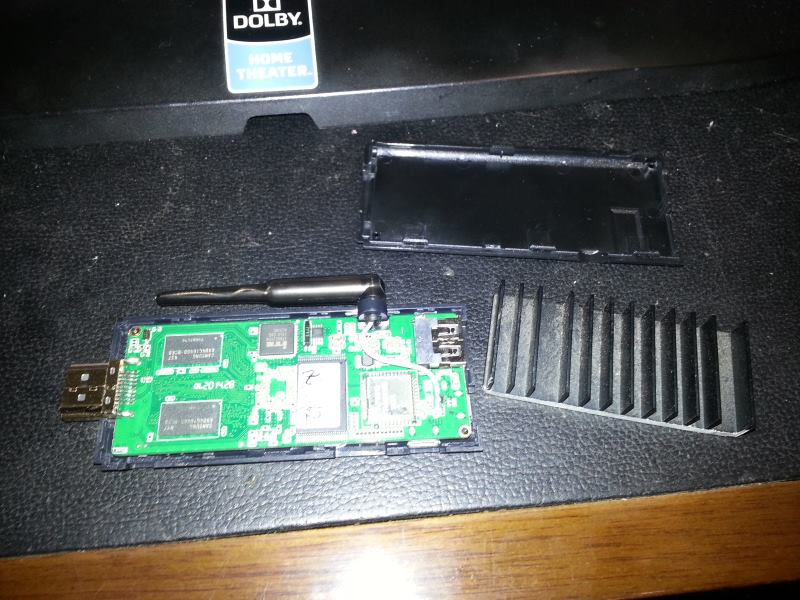
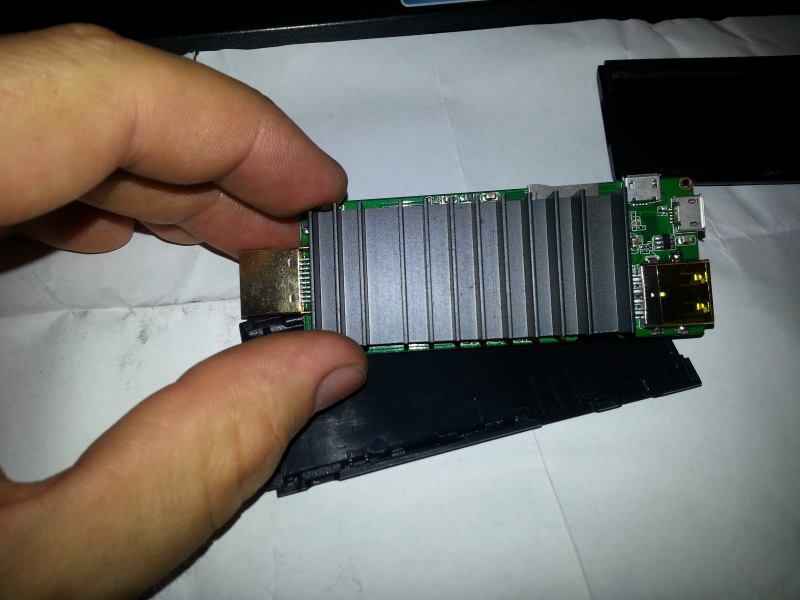
Installing a heatsink
---------------------
The stock cooling in these units is a bit shit. When I was running an overclocked Kernel I found that the unit would quickly overheat and go into a rebooting loop.
To get around this I popped it open, cut a hole in the outer case with my Dremel and fit a large metal heatsink I scavenged from an old video card. This heatsink is much larger than needed and I think you could get away with using one that is around 20mm x 20mm. Though bigger is always better.
Upgrading the wifi antenna
--------------------------
Originally I had a lot of issues with the wireless signal being unreliable. When I would try to transfer any bytes over the wifi the connection would drop out. Eventually I suspect these wireless issues were caused by running a bad Rom+Kernel combination (Pure XBMC build by Walter on Android 4.2.2) on the hardware originally. I found that upgrading the antenna did boost my reception from 3 bars to 5 bars on wireless N at a distance of 10 metres from the switch. I've been able to successfully stream a 720p 6.5gb movie over the wireless connection after making this modification.
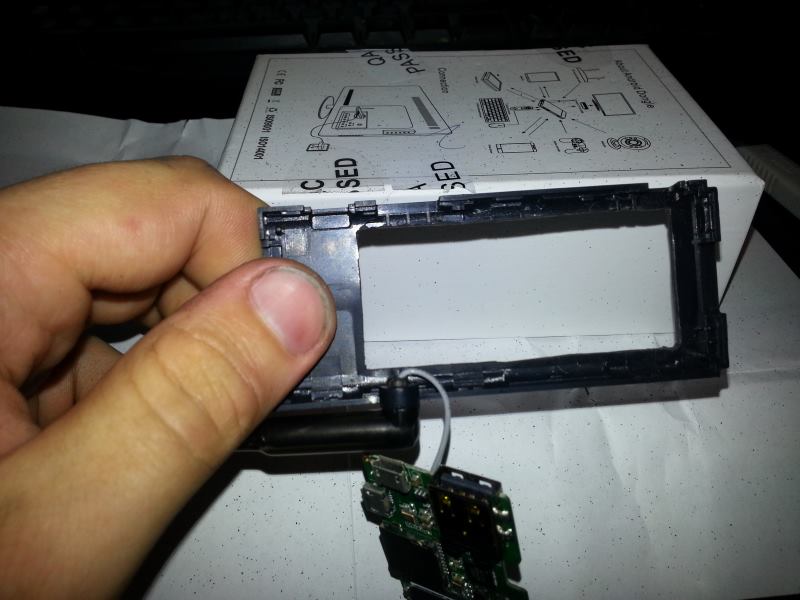
1) Open the unit up
2) Cut off and remove the original wireless antenna
3) Desolder the original antenna from the board. The largest solder pad on the CX919 board is the antenna ground. The smaller solder pad is the antenna active centre wire.
4) Locate an old wireless N router or similar and scavenge its antenna.
5) Solder the new antenna to your CX919 board. Alternatively you can solder a 12cm long single core wire to the antenna active solder pad on the CX919.

Running the unit on an external power supply
--------------------------
The unit is designed to run off the little USB port that's typically next to the HDMI port on the side of your TV. I found that on my TV this USB port was limited to 500ma as per spec of normal USB ports. Unfortunately the unit would try to draw more power than 500ma like when I tried to turn on wireless or bluetooth and it would reboot. To get around this I used a 2M long USB extension cable and powered the unit from a wall adaptor.
Installing Software and Apps on your unit :
Media Playing Software
----------------------
To manage my media I installed a fork of the popular media software XBMC on my TV stick. The fork I chose was called SPMC. To install SPMC simply navigate to the Google Play store and install it as you would any normal app.
[https://play.google.com/store/apps/details?id=com.semperpax.spmc&hl=en][3]

SPMC is a spin off of Kodi (Formerly XBMC) that is designed specifically to run on Android devices and the Rockchip which our hardware uses.
Screen Rotation
---------------
Rotation is enabled in this ROM. I have not figured out yet how to kill that.
Thus when you run a game or things like Antutu, the screen will rotate on graphics.
I have supplied in this rom a rotation locker APP.
You can turn it on and even set it to run at boot to lock rotation to landscape.