ESP8266 Hacking/Tips

I’ve been playing around with these chips for a little bit and I figured I’d share some gotchas I’ve had with using them.

For those not aware, the ESP8266 is a <$5 wifi module with a built in TCP/IP stack and wireless that can be commanded over serial with its default firmware, adding wifi features to an arduino on the cheap. It operates at most on 3.3v and can run off two AA batteries.

There are also new customized firmwares that allow you to directly program the 32-bit processor onboard like nodemcu, micropython and esp8266webserver. You can also write your own firmware for it in C using the manufacturer provided full SDK for the chip.

I’ve mostly played with nodemcu so my posts will probably focus around that. nodemcu is a custom firmware for the esp8266 that allows you to write code in lua to run on it. It currently supports using all of the wifi, IP and GPIO functions on the chip and is a fairly robust option. You can also save your lua code onto the chip to run at startup every time.

Flashing nodemcu can be done with an ftdi programmer at 3.3v and there is a very good tutorial on this at http://importhack.wordpress.com/2014/11/22/how-to-use-ep8266-esp-01-as-a-sensor-web-client/

Note however the following roadblocks:

FTDI

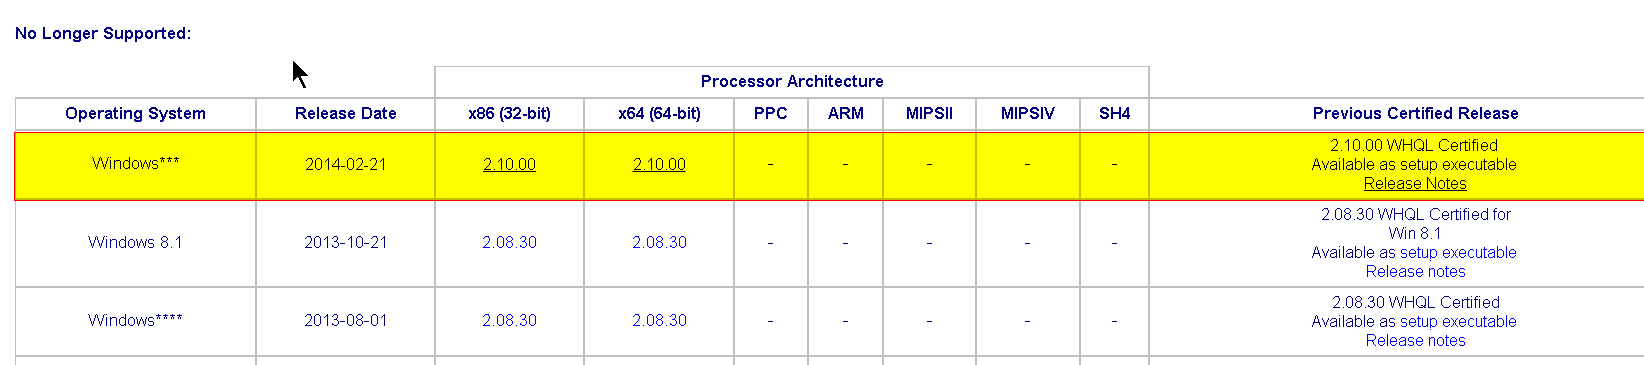
FTDI has released a version of their drivers that will detect and brick non-genuine FTDI clones. This means you may have ended up with an FTDI programmer that stops working when you plug it into a windows PC as this version of the FTDI driver is pushed by Windows Update. You will want to install version 2.10.00 which is available on FTDI’s site under 'No longer supported"

If you happen to install the 2.12.00 drivers accidentally, you will need to download the CDM Uninstaller tool from http://www.ftdichip.com/Support/Utilities.htm and then run CDMUninstallerGUI.exe from within the zip.

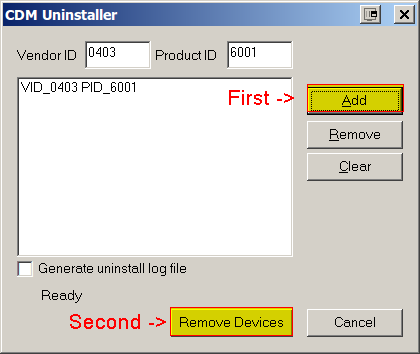
Hit Add and then ‘Remove Devices’ and this will uninstall the drivers that cause bricking. You should then install the 2.10.00 VCP drivers as above.

If your device is still not working (On windows, linux OR mac) follow the instructions In this Video which requires downloading MProg from the utilities page at http://www.ftdichip.com/Support/Utilities.htm

ESP-01 Pinout

In the blog post I linked it shows the following wiring setup:

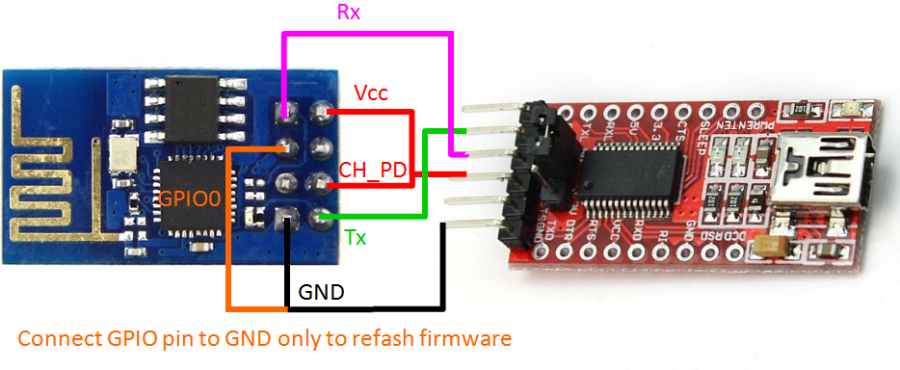
I spent ages pissing around trying to program this until I realised that to be programmed you need the following:

  • CH_PD to be connected to VCC (or the 3.3v pin on the ftdi programmer)
  • GPIO0 to be connected to the GND (or the GND pin on the FTDI programmer)

Then, once it’s programmed you need to have CH_PD to be connected to VCC (3.3v) permanently otherwise it won’t respond to any serial commands. I’m not sure why this is and am following up the docs to find out why.
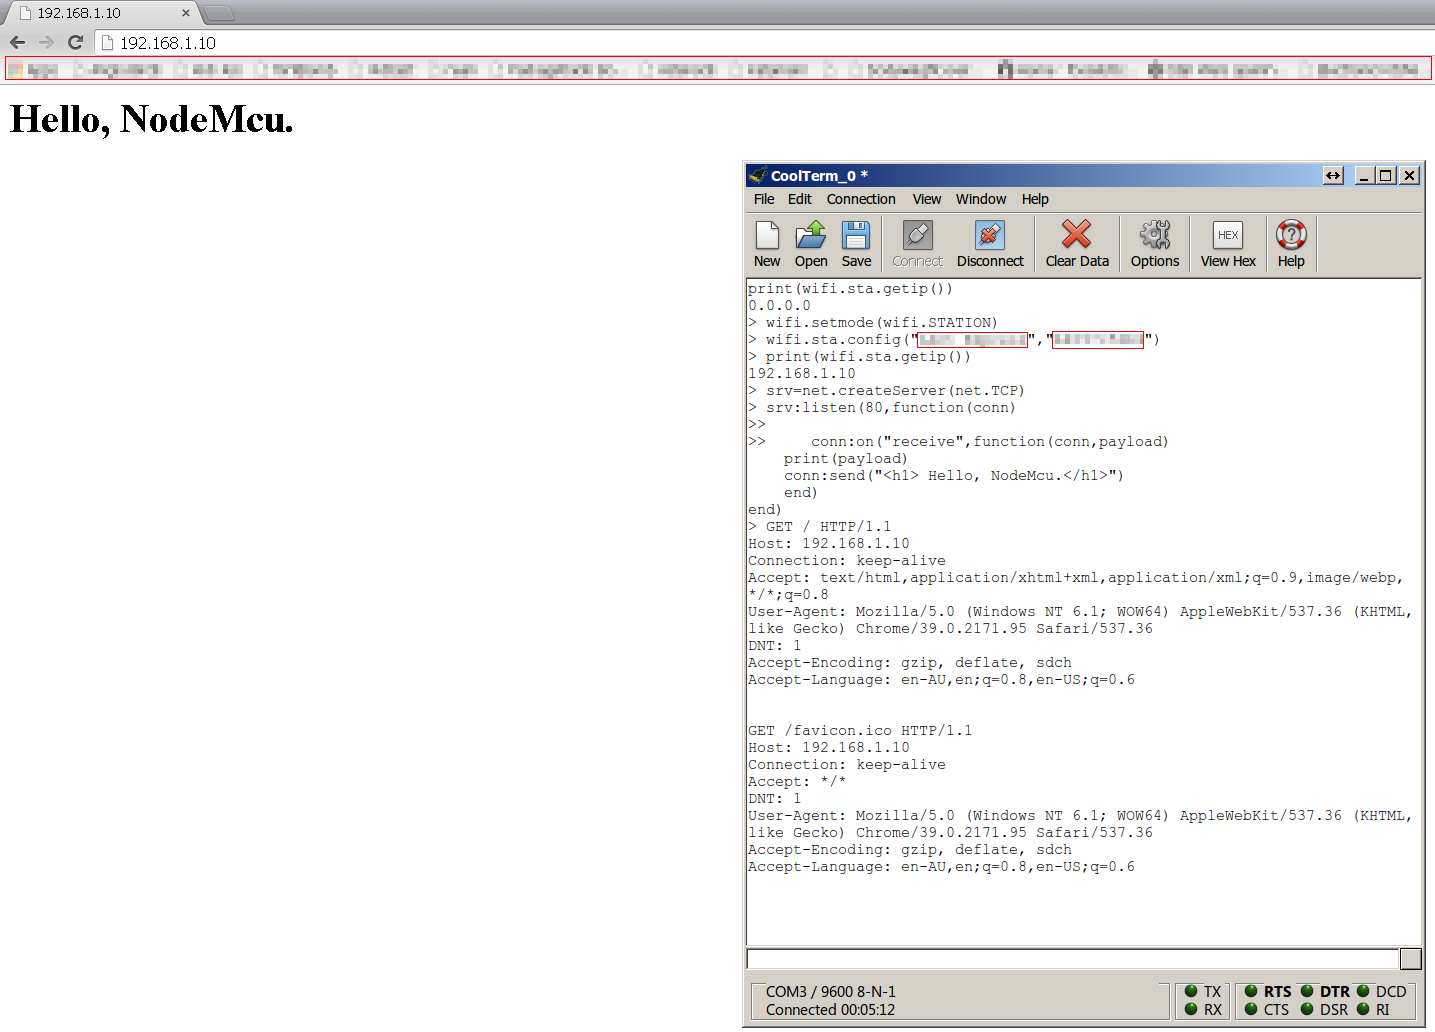
Once Programmed

You can now do cool shit on nodemcu in lua, like hosting webservers, posting to thingispeak GPIO values, turning on and off leds remotely.

Just make sure you read up on nodemcu and the esp8266 forums as there are guides on saving the lua code you input into a file that the esp8266 runs on boot.

Hello world :smile:

2 Likes

I wish my NDAed project would get off the ground because these looking usefull :cry:

Just yesterday I got the full SDK from the manufacturer working …and the cross - compiler tool chain etc all work in to the point that I can compile at least one of their examples… and get a couple of .bin files that I need to then flash. I’ve not worked that bit out yet … any way it was quite easy once I knew what I didn’t know. … so if anyone wants hints then let me know.

Hi,

Nice work. I’ve also have been experimenting with the ESP using both the default serial firmware and custom firmware of my own (using the VM / SDK). Apart from the Client / Server examples, the first thing I did was correct all the spelling mistakes in the UART firmware. There are some great error messages in there such as ‘no this fun’ :smile:

It’s a great little device with huge potential which is why Skip and I are doing a presentation on IoT using the ESP as a WiFi platform during the Smart Tech Discovery workshops.

Skip and I will be bringing up some Arduino driven ESP’s that we are working on to tonight’s meetup (Jan 13th). The source code is available on github here: https://github.com/SkipXtian/ESPDuino

All the best!

Ronald Diaz

I’ve heard talk about these ESPDuinos and am keen to see what they’re like :smile:

I got a parcel today containing a few more reference boards (ESP08,ESP03 and more ESP09) and I’m looking to source some of the nodemcu dev boards.

I’m also playing with the new fork of nodeMCU that works much like spark core’s web IDE service called nodelua. I plan to get it running on a few esp09’s headless tonight to see how robust it is (think 4-5 at a time).

So the ESP8266 support in Arduino works well now using the Custom Boards support added in Arduino 1.6.4.

To get the 8266 support working in Arduino 1.6.4 you just need to:

You will need to make sure you select the ‘Board’ properly in the Board list or the esp8266 libraries won’t be available so your compiles will fail. Also make sure you have the right serial port selected and GPIO0 held down and CH_PD held up!

This moves me onto something that @pelrun put me onto called Blynk. They have an esp8266 compatible sketch that works with Arduino 1.6.4 and the esp8266 libraries.

It hooks into an android app that lets you drag and drop buttons to create an interface that lets you toggle/read GPIO pins on the esp8266 from an android phone easily.

If you’re going to use it though, grab the most recent version from https://github.com/blynkkk/blynk-library/archive/master.zip

I have been having issues with my 8266 not running the blynk code on boot though, and I’m not sure if that is because I’m not holding the right pins on boot in the right states.

1 Like

FYI, GPIO2 and GPIO15 are also boot selection pins (guh). All three have to be set correctly at bootup to select between UART(i.e. upload), SPI flash and SD card.

ESP8266 stuff…

I’ve been writing code for esp8266 chips the last few days, and thought you all might be interested… it’s a TX module, and a complete RX for common Radio Control of vehicles etc.

Most popular transmitters ( like the turnigy9x and Tarannis ) have a “JR” Module bay in the back of them, and this is where I’ve added the esp8266 chip!

More details, including all the code, and a demo video are here: https://github.com/davidbuzz/esp8266_wifi_tx

Also… If anyone has any ESP-01 or ESP-07 modules they don’t want, I’m in the market for a few of each.
( this link shows you all the types: http://l0l.org.uk/2014/12/esp8266-modules-hardware-guide-gotta-catch-em-all/ )

( FYI: the ESP-01 is the module that has the 4x2 headers on it, pointing down, and the ESP-07 is the one that has a U-FL ( or is that u.fl ) antenna plug on it, and is surface mountable . If anyone has either of these spare, let me know in the next few days. :- )

Also, on unrelated esp8266 news… ( which I guess means it’s related ) … MESH NETWORKING IS NOW A GO!. THis code is only 7 days old, so get it while its HOT HOT HOT!

https://github.com/espressif/ESP8266_MESH_DEMO

I’ve discovered that the Tensilica CPU in the esp8266 is actually really well documented here: http://0x04.net/~mwk/doc/xtensa.pdf it includes all the voodoo you ever wanted to know about instruction sets, special registers, interrupts, exceptions, opcodes, architecture diagrams, address spaces, peripheral bus, debugging, masks.

If you don’t know what all these things are, then one of the following is true:
A: this post is probably not relevant to you
B: you are about to delve into a world of wonder and mystery that is the CPU.

Oh, … and for the record… I was after a low-latency GPIO interupt that was preferably better than micro-second accurate… so I started reading that document. now I know it’s possible, I just don’t yet know how. :slight_smile:

I’m starting to make IoT “smart” switches to wire into my house. I love the fact that I can run (micro)python on a sub $5 WiFi enabled micro controller with plenty of I/O. When used stand alone, the ESP8266-01 was a pita for permanent installs when you need the GPIO because of the boot select pins doubling as the GPIO pins. (probably not an issue when using with an arduino) However, the ESP8266-12 have been fantastic! All up I have a tiny WiFi enabled relay that can control any source of 240v for < $10 each.

1 Like

I bought 5 ESP32’s today from China… I can spare one if you want… Tried to get from jaycar but they had no esp8266’s at all…Or I have some ESP-12E ESP8266 chips