I’m writing this on behalf of @Boo who did most of the work but is too busy to complete the build log for this project, and I really thought something this awesome & hacked-together deserves proper documentation! ![]()
Fallout 4 was released in November, and we had a last-minute idea to make a Yes Man costume for the midnight release event. And when I say last-minute, I mean that this entire costume came to be in under 72 hours, so everything was incredibly rushed and we were constantly alternating between tasks as paint/glue/resin dried. The main inspiration for this costume is that Yes Man scoots around on a single wheel, which I’ve been known to do on occasion.

A PDQ-88b Securitron. This one is known as “Yes Man”.
Unfortunately we forgot to take many photos during the construction progress because we were too busy rushing to get everything done in time, but here’s the few shots we remembered to capture with some details on its construction.

It started with extracting Yes Man’s 3D model out of the game. This was turned into a rough polygon map with Pepakura, and from this, a rough blocking was made literally out of recycled cardboard boxes and masking tape. From this, you can see a lot of the basic shape is already there, but it’s very fragile and only just capable of supporting its own weight right now - definitely not for wearing.
To do his front screen, a cheap Android tablet was borrowed and zip-tied in place so it was secure but could still be added/removed. To replicate the look of an old-fashioned CRT, first a piece of scrap clear acrylic was cut to size on the HSBNE laser cutter. A temporary frame around it was built out of scrap wood from the Wood Shop and some clamps. It was then hit with a hot air gun to get the whole sheet nice and flexible, then even pressure was applied as it cooled by using a block of foam borrowed from the Createatorium. The foam acted to smooth out the pressure evenly over the whole surface and its thickness helped insulate my hands from the burning-hot acrylic as it slowly cooled.

An incredibly unflattering photo of myself bending the acrylic lens. I was stuck in this pose for around 20 minutes until it cooled enough to retain the bent shape. Horrible photo, but ya gotta do what ya gotta do. ![]()
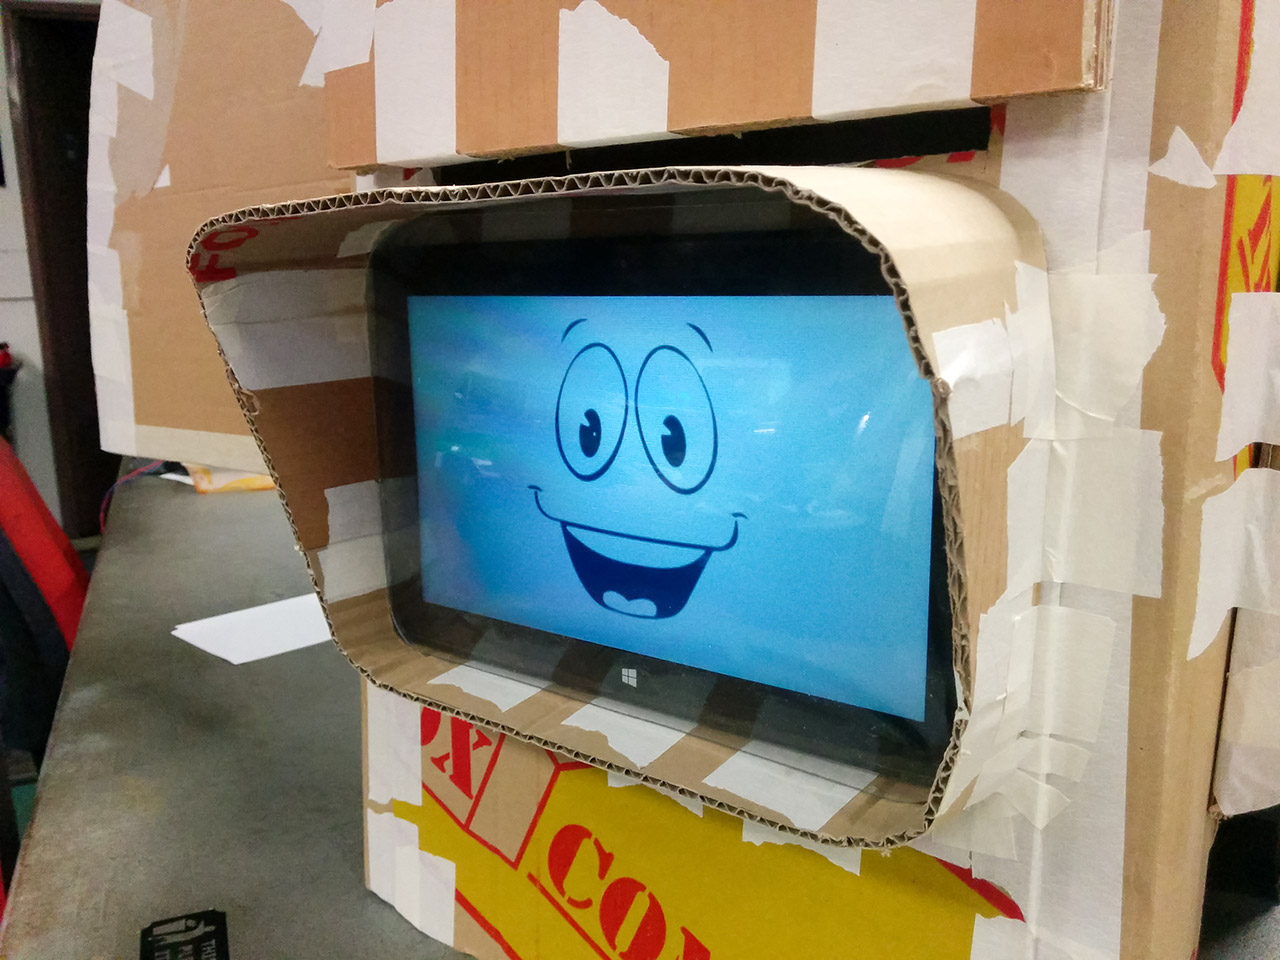
The acrylic screen up close, inside a scratch-built cardboard shroud. It turned out fantastically and really helped make the costume. (It was also super handy to prevent people touching the touchscreen and changing the image - yes a few people tried!). In this shot you can see the “old” eyehole above the shroud which ended up being used only for my corner peripheral vision and for breathing. The final eyehole was the tiny gap between the top of the tablet and the shroud. Because of internal reflections from the curved acrylic off the screen, you totally couldn’t see me inside there and no one figured out how I could see out of it. Lots of people asked questions about that and at least one person thought I must be remote-controlled because there’s no way I could see out of that and balance on a unicycle at the same time. ![]()

Tests were made with cutting out or keeping solid the side panels, and it was decided that it was quicker/easier to just keep it solid. A wooden frame was fashioned inside the structure using scrap wood from the Wood Shop, and more foam from the Createatorium was added to the interior top to cushion the weight on my head.
Unfortunately we don’t have any photos of the progress beyond this point. ![]() From here, all masking tape joins plus any remaining structural cardboard that wasn’t reinforced by the wooden underframe was fibreglassed, thanks to a kit we found in the Boneyard. Strips of paper were used like paper mache with the leftover fibreglass resin to smooth out some of the larger flat areas. Once the resin was mostly dry, car body filler was applied to smooth over any remaining areas, then sanded back to provide an even finish. Copious quantities of many different colours of paint were applied. Final detail elements were attached which came from the Createatorium and Boneyard (cardboard tube, thick grey power cord, PC speaker, etc). A few more supplies were sourced from a local hardware store (gardening bucket, metallic flexible air ducting).
From here, all masking tape joins plus any remaining structural cardboard that wasn’t reinforced by the wooden underframe was fibreglassed, thanks to a kit we found in the Boneyard. Strips of paper were used like paper mache with the leftover fibreglass resin to smooth out some of the larger flat areas. Once the resin was mostly dry, car body filler was applied to smooth over any remaining areas, then sanded back to provide an even finish. Copious quantities of many different colours of paint were applied. Final detail elements were attached which came from the Createatorium and Boneyard (cardboard tube, thick grey power cord, PC speaker, etc). A few more supplies were sourced from a local hardware store (gardening bucket, metallic flexible air ducting).

It was close, but with paint still wet in places and it still stinking of not-fully-cured resin, the project was just finished in time! We made it to the midnight release in the city, and it was incredibly well received as the best costume there. I managed to navigate riding my unicycle with limited vision on the uneven paved terrain well, and so long as I kept moving the smell inside the costume was actually only minor. So many people couldn’t work out how I could see out of it, or how I was controlling/steering the unicycle. A few people thought I actually was a remote-controlled robot!

Myself and @Boo as Vault-boy, a costume also made by @Boo. Overall I’d call this a cosplay a resounding success.Especially when you consider that it was made in under 72 hours,using mostly scraps from around HSBNE and under $50 of supplies! The Internet at large loved it too - it hit the front page of Reddit and Imgur, as well as a few geek blogs and Tumblrs.
Completed costume rolling around HSBNE
We may fix it up to show off again at a future convention or we may move on to another project - who knows what the future holds. Either way, it shows that you can build something amazing on a shoestring budget in very little time at HSBNE, and without the space there’s no way we would’ve been able to do this costume.