New front basket bracket for a mountain bike

So, last weekend we had the Yarraman to Wulkuraka bike ride.

https://www.brisbanewicen.org.au/2018/08/04/y2w/

(Yes, HSBNE gets a mention. You guys helped make the ride happen.)

All in all, things went okay, but one problem that was highlighted was the mount for the front basket. The basket is designed for a road bike, and so its mount can only accommodate handlebars that are about 20mm in diameter. Unfortunately those for a mountain bike are bigger, about 30mm in diameter.

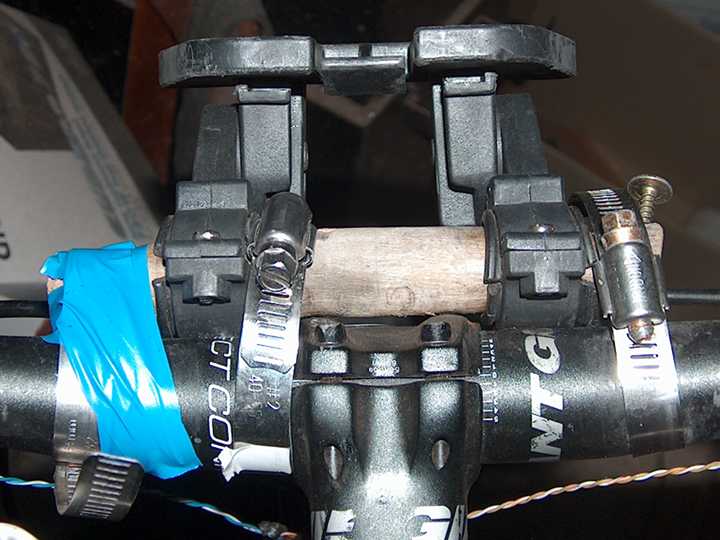
My solution to this in 2012 was to use a length of former broomstick handle. Cut a length off, mount the basket mount to that, then hose-clamp it to the handlebars. Those two hose clamps worked well on city roads. The screw was added some time later to help stabilise things, but I never got around to replicating it on the other side. It didn’t seem to slip off on Brisbane roads.

However, on the rough and tumble of the Brisbane Valley Rail Trail, that left-hand one kept trying to slide down to the thinner part of the handlebars and so the whole basket would then start swinging from the right-hand clamp, the screw being the only thing preventing the basket from falling to the ground.

Now, while I could put another screw in for the left-hand side, it’s worth observing the splitting of the wood observable from the right-side, and also this bit of wood is very heavily compressed on the left side as well. Basically, it’s knackered, and so it’s time for a replacement.

I could replace it with a longer piece of metal tube, that is what I did on my other bike (because the piece of broomstick handle there split through completely!), but really these are kludges around the real issue: the mount is not designed to fit to a mountain bike.

My thinking is this: the mount is in four parts.

Part 1 is the part the basket actually fits to:

There is absolutely nothing wrong with this part, so my thinking is whatever I make, I just design it with the view that it mates with the sockets on each side of this part. The critical detail is that “ratcheted” surface which prevents slippage.

Parts 2 and 3 are what mate with this surface and provide one half of the clamp for the handlebars:

Nothing wrong with these parts other than the fact that the section that clamps the handlebars has a too small a diameter.

Part 4 is the other half of that clamp… and yes, it had a hairline fracture that became not-so-hairline after disassembly:

My thinking is this:

  1. model replacement parts 2, 3 and 4 to suit a mountain bike.
  2. either:
    2.1. convert the models into a design for moulds for 3D printing OR
    2.2. 3D print the parts and make a mould from them
  3. use the created moulds to make the real parts (possibly using some hardened resin)

I’m open to other ideas, but that’s the thought at this moment. I’ll obviously need to get some dimensions going then break out OpenSCAD to create the design.
For the molding part you don’t need CAD - you could just do it with clay/plasticine.

You could also add some filler like fiberglass to the mold before pouring in the resin (use a thin resin if you do)

Fair point regarding the analogue methods. One problem is that I don’t need to make exact replicas of the existing parts, I need to modify parts of them which might prove a challenge. Not impossible though. I’ll give it some consideration.

I figure it’s worth making up moulds that can be re-used for this since I suspect I may need to cast new parts as old ones break.

And noted on the use of thin resin, yes I was thinking of a filler to add some additional strength.

yes certainly make a silicone mold. But you just might not need to 3D print or CNC out the father. You could perhaps get a 30mm tube/dowel and mold some clay around it to make a model of the bracket. Then use this clay part to make the silicone mold.

It is an alternative to 3D printing and CNCing

If you don’t mind using non-open tools (fusion) and want to go the CAD route, We could make 2 half molds with complex part lines

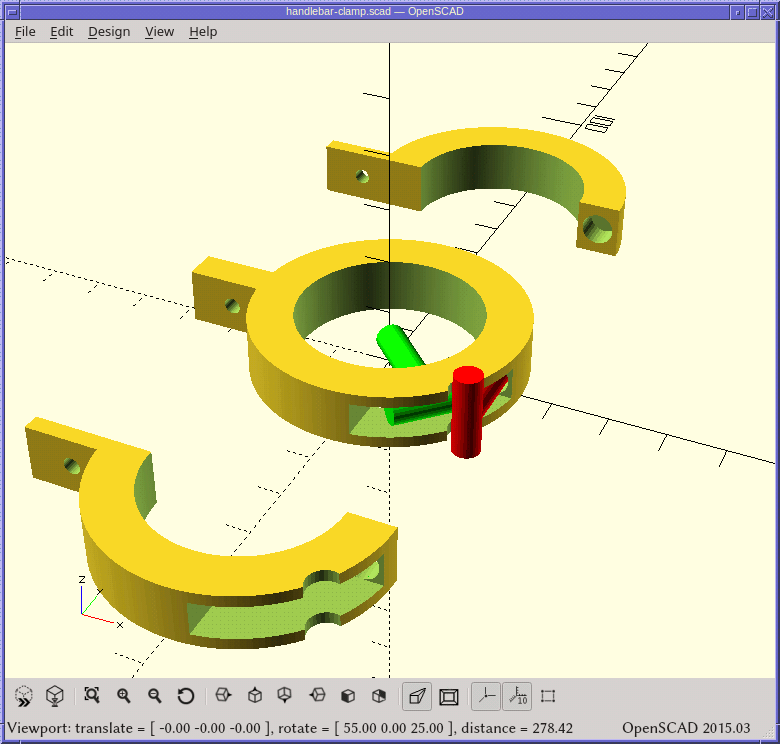
Well, I’ve given the CAD route a try… fooling around with OpenSCAD I came up with this:

I suppose that was a couple of hours, including the emerge openscad build. I did look at giving FreeCAD a try, but I’ll wait until 0.17 hits the portage tree.

If nothing else, this helped me figure out the dimensions.

Printing this out will need supports in a few places, but nothing too drastic, on the underside there’s a 5mm countersink for the head of a screw and then there’s the small T-pieces which can be seen in the shot above. These are not hard problems to solve. :slight_smile:

1 Like

So, doing some more thinking about this, there’s no reason why the little hinge bit that sticks out has to be printed with the rest, I can just make a hole and glue it in later.

The other thing is that the two halves of the clamp must mate. So that got me thinking as to whether I should design that as a separate piece and union it to the others. I decided to design just the clamp part itself, as a single piece imagining that this would have the handlebars threaded through it. Then, cut it in half using the intersection() function.

For testing purposes, I modelled that little piece both where it’d be when locked (red) and where I’d be putting it to attach it (green). This allows me to get the alignment perfect, as I then just duplicate the part and cut off the bit I don’t need.

I still have to model the third piece, but the rest can be pretty much anything I like, so is not nearly as difficult. This is what those two side pieces look like now. I’ve made them thicker too, just to make the geometry in a few places easier.

To keep the bracket from spinning around, the old bracket had a bar joining the two base-halves of the handlebar clamps. I’m thinking this can just be a couple of sections of straight plastic like this:

Thinking about that cut-out on the second half of the handlebar clamp: I might need to cut that piece in two and glue/bolt those together. Some more pondering needed methinks. :slight_smile:

That little piece looks like a major weakness to me, it has to take all the clamping force, as well as the weight of the basket, in tension.
What about using hose clamps (I LOVE hose clamps!) to provide the clamping force, so that the plastic part only has to worry about carrying the weight of the basket? if you made the part somewhat like the below image, chop the large bracket circle in half (just as you were planning), then join the halves by passing a hose clamp around and through the gap in the centre.
Also (and perhaps you were planning on this already) I’d fillet those sharp internal angles or - as below - just go with “maximum fillet”, ie, tangent :slight_smile:

Also I notice that the handlebar bends either side of the centre, which might be a source of stress on both the linkage between the two clamps and the intersection at the basket mount. It might be worth building in something to allow for that, maybe use some inner-tube over the handlebar which will compress enough to allow the brackets to mount parallel to each other (ie, slightly off-normal from the handlebar).

Devalue my 2c as appropriate - I have zero casting/printing experience.

untitled

Redhatter - if you are going to be in tomorrow night I will bring some plastic parts and silicone molds I just made for someone on the weekend so you can see them.

They are a slight variation of a battery holder I did in the past. It might give a feel for how strong the stuff is and what you might get away with.

@agittins You bring up a valid point regarding the forces involved, and I’m not against using hose clamps, although I’d have to consider how to best design it. The design you show below your post looks like it could work.

I will point out that the originals of those brackets have not broken. Yes, there’s stress between the two brackets which probably lead to that join breaking, but so far, that’s all that has broken. There’ll be a bit of fine tuning I think. :slight_smile:

@andrew1973 Yeah, I’ve been meaning to get to the space for a while, so far it’s just been WICEN meetings I’ve gotten to. If there’s a god, then 2 of my 3 surviving grandparents are sitting in his waiting room (and no I don’t mean Woy Woy). So that has kinda taken precedence over everything.

When things settle down (hopefully by new year) I hope to get back into doing more at the space.