I need someone with some artistic skills to do generic designs for the front nameplate.
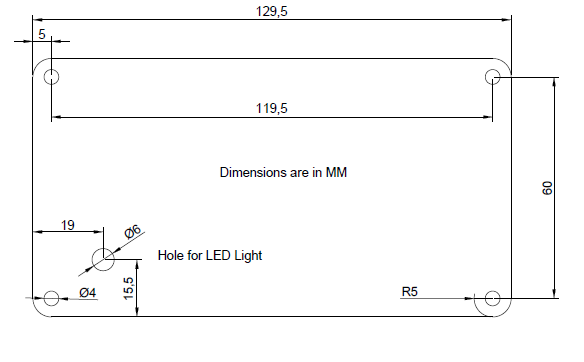
I have drawn the outline of the plate to hide the solenoid and electronics. The plates can be anything you like e.g. 3d Printed, Laser Etched or we could just print them in the colour laser printer we have and laminate them. Then cut them to shape with laser cutter. Let your’e imagination go wild.
If you think the plates are too big or the wrong shape, change it just leave all of the holes intact as that is how they will be mounted.
I think the nameplate should include a box reference number in a grid pattern. Numbers for rows letters for columns or vice verses. Cartoon pics of the tools inside may look acceptable also.
This will have a huge impact on the look of the tool armoury. You don’t need to be a member to contribute or even have to attend the space to print them out.
Ok, Well I’ll given it a quick go; Interested to see the thoughts on my ideas.
The basic idea is to provide a quick rundown of the tool that is in that case. So I propose to print out an information sheet and lasercut (is that possible? I’d assume a low power, highest speed - I can probably give it a go tomorrow using my School’s cutter?? ) a hole for the LED into it. I made a quick one that can be seen below:
First Question: Is it possible to make the plate taller? This would allow more text. Also please note that I didn’t play around with text size or anything here.
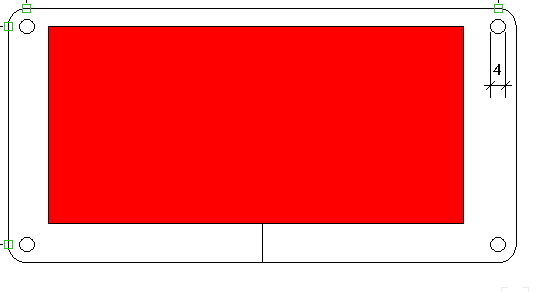
That blue dot is the guesstimate of where the LED light is - I can align it better if you guys like this.
Then it can be laminated and attached to the frontplate into the red section as seen below;
edit: Realised I hid the LED hole and left some dimension lines in; I hate Vectorworks but it’s all I have easy access to it atm.
So let me know what you think!
Just was re-reading the OP - Not sure what you mean by the box reference number but you did say we can resize it so we could make it bigger and include these references and more text should you guys want.
Thats a good start!!
I agree with @denominator that we properly don’t want to repeat the same information over and over again (Talking about HSBNE and the logo)
This will give you more room to add text.
Box Reference is Row A, Column 2 to help the selection of the door to open.
Might be a idea to have a webpage of a more detailed “How to use guide” online linked with a QR Code or something easy to type?
(Ducks as QR hatters flings random tools)
@Sam that’s awesome I didn’t even thing to put instructions or safety
warnings on the front of the doors. The laser cutter will have no problems
cutting the design into the paper.
I agree with @lhovo we can just drop the logo and put a Reference number
in its place.