Tiny House on Wheels Project

My Tiny House on Wheels (THOW) project has been slow going so far. After waiting 8 weeks for my trailer to be built, I got knocked out while playing footy and have had post-concussion symptoms since. But I’m tired of lying around waiting to get better so will do little bits of work whenever I can.

The first task has been prepping the trailer. I could have found a second hand trailer and done any repair work to it myself to save money, but I’m not especially good at metalwork or auto repair, so I decided to have one made professionally. It is after all the foundation of the house, and will also be by far the most expensive component.
First step was to weld on an extra cross member. The trailer was built 6m long but a last minute design change I decided to extend that by 200mm so just added another 100x50 cross member over the tongue. As my design is mostly rear heavy having the axle further back from center will also help with weight distribution and ensuring around 10-15% weight over the tongue.
Thanks heaps to @Drew_Spriggs for help with the welding.
Next step was to run cabling for the lights and brakes. I didn’t have the manufacturer do this because #1 save a bit of money and #2 the house will build over the trailer chassis so no point attaching lights just to move them later. I ran the cable down the chassis of the trailer and wired up the brakes on both axles. I then jacked up the tyres off the ground and hooked the cable up to my car battery and checked the brakes engaged by rotating the tyres. All good on the first attempt so point 1 to my half damaged brain.

Once the house is complete, it will be registered for road travel as a caravan. So it must comply with the Qld Vehicle Standards Bulletin, ie have all the required road lights, door on the left hand side, fire extinguishers, and be no more than 2.5m wide x 4.3m high (off the ground). Apart from that there are no current codes for building a THOW. But I’ll be building as much as possible to QBCC so when councils inevitably try to regulate these and get their $$, I should be covered.

Google Photos

Google Photos

7 Likes

Wouldn’t this type of project fall into the “manufactured” home category under queensland legislation? In terms of building codes there is the national construction code (ncc) and qld development code both available for free download from relative sites… id suggest that building to caravan standards will be the least onerous of the standards to build to…

Good luck with the build.

Thanks. This is a pretty good document that outlines where current legislation is at with THOW’s in QLD.

To summarise, industry standards exist for caravans (RVMAP Accreditation), mobile/temporary structures and manufactured homes; however there are fundamental differences in design, construction standards and intended use between these and THOW. Apart from the requirement to comply with the Vehicle Standards Bulletin 1, there are currently no standards designed specifically for THOW.
Some sections of the BCA/NCC are not suitable for Tiny Houses and would require some relaxation. These are mostly related to things like minimum ceiling height, minimum room size, stair rise/run etc. In the US, they have amended their National Building code with an appendix specifically for tiny houses. I suspect as they grow in popularity here, Australia will eventually follow suit.

My banged up noggin is still slowing me down, but I am progressing. The floor is pretty much done.

I’ve opted for no underfloor insulation a la Queenslander style. I’m not at all concerned about heat loss through the floor in winter, and in summer coupled with a roof vent should dissipate heat from the day fairly quickly. I may eventually move the house to a cooler climate, at which point I will put insulation between the trailer beams and enclose with some gal sheet.
I started by putting some waterproofing tape on top of the trailer chassis. (Actually I should have started there but forgot, so had to come back halfway through to do this…stupid brain). This will help seal the screw penetrations.
Then I put down some breathable membrane wall wrap to keep out moisture but still allow the floor to breathe.
The subfloor is 19mm T&G structural ply, cut to size and screwed directly into the trailer. I sealed the edges of the ply and the screw holes, but left the faces untreated. This house will stay in one place most of the time so shouldn’t get exposed to too much water and leaving the faces open lets the ply breathe. When the internal fitout is done, the subfloor will be covered with loose lay vinyl planks (which I scored from a building site for basically free).

I still have to cover the wheel wells with ply and finish screwing it down. After that, framing!

2 Likes

There you go wind… try to blow it away now…

My day job is doing Building Energy Efficiency Assessments, which involves spending a decent amount of time staring at various parts of the NCC to decode what it means. While not a legal requirement for this dwelling, I’m sure you know it’s still a handy reference to peruse - but I mention this because at work we’re one of the only consultants in Australia that caters towards unique, standards-breaking, or “architecturally designed” designs, including tiny houses (not on wheels) and transportable buildings. I’m strongest in the Energy Efficiency areas of the Code, but I’m still reasonably familiar with a lot of it. Feel free to find me at the space & hit me up if you need any advice. :slight_smile:

1 Like

Frame is up! Shout out to @ltp @buzz @Philthy for their help muscling these into place.
Google Photos

I built the frame with 70 x 45 timber. Most THOWs are built with timber or steel frames or SIPs (structurally insulated panels). There are advantages and disadvantages to each: steel is about 1/3 weight of timber but 3 times the cost; SIPs are also more expensive but faster to install; steel acts as a thermal bridge and requires care to provide sufficient barriers to conducted heat. Ultimately my decision came down to my body of knowledge as a DIYer - I am more familiar with timber.

I designed the frame according to building code and span tables. Due to the relatively small axial load I could use 70mm studs instead of the normal 90mm. Those extra few cm’s of internal space will make a lot of difference in such a small space. But they will flex more so will be braced in multiple ways to resist the racking forces associated with road travel and side-on winds. More on that later. For now the frames have been bolted to the trailer chassis with specially designed tensioners in the corners and 12mm bolts.

The long side walls were a challenge to build, with a 15 degree raked roof line and having to build around non-structural wheel wells. One of the wheel well frames is a bit wonky and will need reinforcing. I made a mistake with one of the window openings and will need to reposition it. Some of the extra long studs have warped and twisted so will need to be shimmed up before applying bracing. And the top sections around the roof peak are flexing but will get squared up when roofing frame goes on.

Another issue: during some of the recent rains, water got in between the plywood subfloor and the waterproof wrap underneath and got trapped there, forming mold on the ply. I had to cut away the wrap and will need to rethink how to protect the underside of my floor. But will do that after Ive finished all the plumbing under the trailer.
I stored the house under the quad to prevent more water penetrating the floor until I can get the house more watertight. I’ve chatted to Team Arrow and Mens Shed and they’re ok with that.

Next steps: putting up the roof framing, strapping (steel straps across the frames) and sheathing (covering the lot in 4mm hardwood bracing ply), and bracing the end walls with threaded rod connecting the top plates to the trailer chassis.

Google Photos

5 Likes

Saw it this afternoon… it is really starting to take shape now. :slight_smile:

The frame is finally squared, trued, strapped, tied and sheathed. Phew. Can really the see the shape of the house now with window openings and the internal bathroom wall installed.
Google Photos

Frame Repairs
Up till now I’ve mostly been working off the design I did pre-brain injury. But parts of the frame design (around the wheel wells) I did after. It wasn’t until the frame was up and had rattled around in my brain for a bit did I realise a couple of mistakes.
Before: The entire load around the wheel well is resting on a few nails. Not good.
Google Photos

After: The load has been distributed properly across 120x35 LVL.
Google Photos

Squaring up
Took a bit of maneuvering but finally convinced the walls into square with some clamps and ratchet straps then temporarily braced into position. This is where a steel frame would have been sooo much easier.

Tie Downs
The house will be subjected to sustained high winds during transit so designed tie downs to resist N3 uplift and racking forces (Brisbane standard is N2).
From top to bottom:
Cyclone straps to tie rafters to the top plate. Triple grips to tie the top plate to the studs.
Google Photos
More triple grips to tie the studs to the bottom plate.
Simpson Strong Tie tensioners to tie the corner studs to the bottom plate and bolted through the trailer chassis with 16mm bolts.
Google Photos
12mm bolts bolting the bottom plate to the trailer chassis
12mm threaded rods connecting the top plate all the way down to the trailer chassis on the end walls

Bracing
Again, bracing has been designed to withstand N3 racking forces. The end walls and ends of the long walls have been strapped with steel speed brace. The whole house has been sheathed in 4mm F27 hardwood bracing ply. Even though bracing ply is usually only needed on the corners, it’s easier to cover the whole lot to have a uniform surface on which to put cladding.

Next steps: fix a few other little errors (3 steps forward, 1 step back :smiley:), add the frame for the roof eaves, install noggings, fix and trim the bracing ply around the bottom of the trailer, then install the framing for the loft.
Last bit is going to be a challenge. Most tiny house lofts extend across the width of the house, but mine will have a step down landing. Similar to this:
Google Photos

4 Likes

Wow! Great work. That is an impressive project. Do you plan to have it trimmed with scaled down version of a ‘regular’ house a little like the one in the example shown? Small colourbond roof you can admire in your dressing gown? :slight_smile:

You got it. Colourbond roof, frilly dressing gown and all. It will look just like a regular house, but tiny :rofl:

1 Like

Just a quick update before next year. The loft has been framed out, complete with step down landing which is just at the right height for me to stand without hitting my head on the ceiling. If you’re taller than me, you’re out of luck. But it is designed specifically with me in mind :grinning:
As most tiny house lofts extend across the whole width, I was a little concerned if my design would provide sufficient cross bracing for the long walls. But have placed a temporary diagonal brace across the end of the high part of the loft, which will later be built in as the railing, and it’s quite solid. I built it from reclaimed hardwood studs I got for free from a house demo. A bit of a clean up with the planer and sander and they look great.

Google Photos

Nice view from the loft. Can I live in it here?
Google Photos

I have also put up the roof sarking: a combination water barrier and insulative layer against radiant heat.

Next steps: Find a roofing supplier that doesn’t completely shut down for the next 3 weeks so I can try to get the roof up; encase in wall wrap (a pliable building membrane to prevent water ingress but promote vapour egress); and put the windows in!

5 Likes

Next time I consider putting a roof up in 38degree heat, somebody slap me.

But more on that later. The first thing I did after my last update was wrap the house in wall wrap. I chose a product that although slightly more expensive, and difficult to find in Queensland, has a higher vapour permeability than most other off-the-shelf products. I am mindful of internal air moisture content in such a small space so consider that in my product choices wherever possible.
Google Photos

Windows
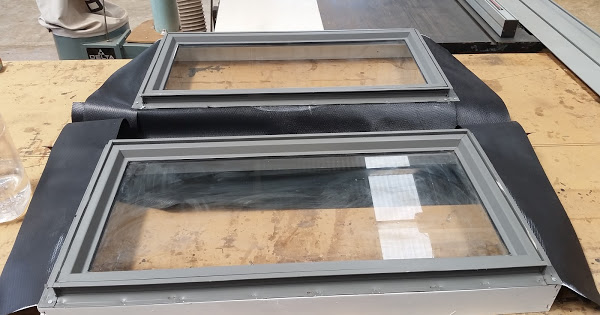
Although I tried to source second hand windows, it was hard to find ones small enough for a tiny house. So I ordered most of mine new. But I did manage to score a free pair of awning windows. They were the wrong colour and had the wrong size reveals however. I removed the reveals from the window frame, trimmed down the reveals and repainted them, painted the window to match my others, attached flashing plastic, and then reattached the window frame to the reveals. A couple hours work to save a few hundred $$.
Before


After
Google Photos

Installing the windows was a fiddly job. Trying to get everything level on a trailer that isn’t exactly level. But they all went in and they all open and close as they should.
Google Photos

Flashings
This is where you try to think like water: “If I was rain, where would I go?”. The plastic around the jambs and sills of the window protects the frame opening from any water that gets behind the cladding. But I needed to install a metal head flashing to divert water over the window. I designed and ordered my head flashings before installing the windows, which was a bit of a mistake as not all my window frames are the same thickness. I’ll need to extend the ones over the two louvre windows. Nothing a bit of silicone can’t fix.
While I waited on suppliers that were closed over the holidays, I found some second hand flashings I could use for the bottom of my walls at a tenth the price of new ones. I had to cut and bend them a bit to suit, and paint them a different colour, but a few more hours work for more $$ saved. These flashings will direct water from the bottom of the walls away from the trailer. I have also covered the joins between the trailer chassis and bracing ply with heavy duty flashing tape to protect from water driven upwards during travel.

Roofing
Just so you know, every single roofing material supplier in Brisbane shuts down for about 3 weeks between Christmas and New Year. I ordered my roof on the 20th December and received on the 12th of January. After waiting so long, I was keen to start work. Bring on a weekend of 38 degrees and gusty winds. Perfect roofing weather.
With big plans of getting it all up in one day, I was defeated by a smashing headache (just to remind me my brain injury has not entirely healed), despite some much appreciated help by @ltp. I came back the next morning in more gusting winds to get it all screwed down.
Those on slack will know I was just a bit paranoid about falling off while putting this roof on. But I built myself a few work platforms to stand on and found once the first sheets were on I could move around without too much difficulty. Just had to be careful not to hit my head on the roof of the quad. Those beams up there are insanely rusted by the way.
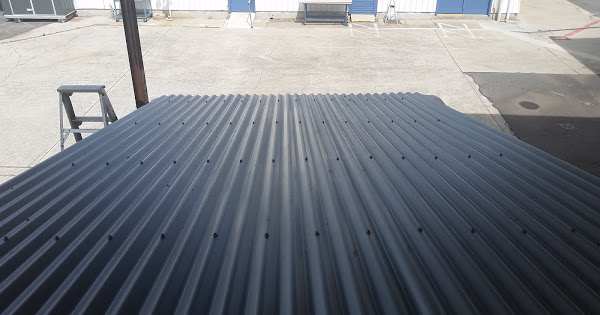
Anyway, technical stuff: corrugated roof sheets have an overlap and an underlap edge, the valleys at the top of the sheet are “turned up” to stop wind driven water, and fastened with hex head screws with a washer on the crests. Other than that there’s not much to installation. Try not to miss the rafters with the screws (I only did that twice…more silicone).
Oh and I specifically chose a light colour to reduce as much heat gain by emissivity as possible.
Google Photos

The roof needs to finished off with a ridge cap, but that will get done later as I need to detail out how my roof vent will get installed.

Next steps: Install wall cladding; corrugated metal for the long walls, and reclaimed hardwood weatherboards for the end walls. Install barge cap flashings and corner flashings. Install the front door.

4 Likes

The tiny house is at lock up stage! Well it would be except the lock on the door is getting caught a bit…another thing I need to fix. It’s been a tough few weeks with some long days getting the house clad, flashed and theoretically waterproofed. How waterproof will be tested in the next week or so when I move the house out from under the quad.

Cladding
The end walls are clad in reclaimed hardwood weatherboards. I got these free from a guy who had pulled them off a ~70 year old house. He wasn’t sure what type of wood it was as they were covered in an ugly yellow varnish. So with (very much appreciated) help from Mum, we set to sorting, cleaning, stripping and sanding around 80 weatherboards. To my surprise, the wood underneath was in very good condition. I took a board to a couple places to get some opinions on the mystery wood - the general consensus being Northern Silky Oak. I had originally planned on staining the weatherboards but decided instead to oil them to bring out that amazing grain. It was many many days of dusty work but I’m really pleased with the result.

Google Photos

Google Photos
The amount of sawdust produced stripping 80 weatherboards

The long walls were clad in colorbond. I tried to find second hand sheets but couldn’t get any in decent condition in the colour I wanted. I would have done the whole house in the weatherboard but a) I didn’t have enough and b) it’s too heavy.

Both the weatherboards and corro were battened out from the frame to provide a cavity drainage channel. This acts as an additional moisture barrier and thermal break between the cladding and framework.

Flashings
The corners where the cladding meets was covered with colorbond flashing. Before installing these though, I ran the wires for the lights. Since the house will be registered as a caravan it will need exterior running lights. I then installed the barge cap flashing which covers the corner where cladding meets the roofing. Finally I installed the ridge cap.
I figured I had put enough holes in the roof just getting that done that I’ve decided I’ll have a professional do the roof vent. A roofer I am not.

Front door
This also took a fair bit of figuring out. Part of the requirement of caravan registration is the front door needs to open outwards. It’s not so easy finding a frame kit or prehung door for outswing doors. I was quoted upwards of $500 for just a frame. In the end I got a heavily discounted oak slab door, some lengths of pre-primed pine jambs and a sill for a french door. All for less than $300.
I built the frame around the door and installed the locks and hinges while it was laid out flat and stained it to match the weatherboards as much as possible. With the door prehung in the frame and the frame braced it was installed into the rough opening (thanks @Reo3 for the help). Again, finicky work trying to get the frame plumbed and level on a trailer that isn’t perfectly level. It took a few goes. Oak door in a pine frame meant the door settled a little and that’s why the lock doesn’t quite fit. More finagling.

Google Photos
Door! (for some reason google photos always cuts these pictures off)

Finally, I did the flashing and trim around the windows. To break up the look of the corro, I put some wood trim around the windows. Pretty happy with how it turned out.

Google Photos

Next steps: A few more finishing touches to ensure the place is waterproof. I’ll then be taking a bit of time off from building while I go back to work to make some more money to fund the internal stage of the build. Before then I will move the house out from under the quad. Thanks everyone for your patience and assistance in getting it this far!!

Google Photos

7 Likes

Progress and updates have been slow of late as I have been busy with work and other health stuff (stupid broken brain). But the internal fitout has commenced!

So currently there is only one company in Australia that insures tiny houses. As of commencing my build their policy was that only the electrical, plumbing and gasfitting had to be done by qualified tradespeople in order for the house to be insured. Unfortunately they recently changed their policy and no longer insure self-built tiny houses. I am exploring options. Despite this, I still called in help for the plumbing and electrical to save time and a steep learning curve.

Plumbing
The house can be hooked up to a standard garden hose to supply water. Inside will be a bath/shower (yes, I included room for a bath!), vanity and kitchen sink. I have incorporated room for a future portable washing machine that will be filled and drained via the kitchen sink.
To save on gasfitting, I am using a portable camping water heater to supply hot water. The HWS hooks up to a standard BBQ gas bottle and can heat up to 4L/min of water to around 50 degrees. With a low flow shower head of 6.5L/min, that should be sufficient for my needs.
Google Photos

Drainage is via PVC pipe mounted under the trailer. It was an exercise in geometry to connect the kitchen, vanity and shower drain together with sufficient drainage fall while still staying above the lowermost point of the trailer chassis and therefore reasonably protected. The grey water outlet sticks out between the drawbar and can be hooked up to whichever grey water management system I choose.

No blackwater as I’ll be using a composting toilet.

Electrical
Thanks to @Thermoelectric and Jonno for the advice on my setup. I did the rough-in myself but will ask someone else to hook it all up for me. That comes later.
To design the electrical, you need to have some idea of your draw, ie what appliances and lighting. I considered using an ‘offgrid’ setup with solar and DC appliances like in caravans but they are ridiculously expensive. Instead I decided on more efficient 240V appliances. Lighting will be LED. A lot of caravans use a combination of 12/24V DC and 240V AC for off-grid and on-grid use. But I’m not going to be completely off the grid, and dealing with AC and DC circuits can get tricky. So the whole house will be 240V, with LED converters for the lights. Supply to the house can be either through main supply (via a 15A extension cord) or through a solar setup with inverter.
For appliances, to save on gasfitting, I will be using a portable induction cooktop. No oven, but a convection microwave. And a small fridge. All up with everything running at the same time I should pull about 13A.
(I’m also planning on installing an air con on a separate circuit but still working out the logistics on that one…more on that later).
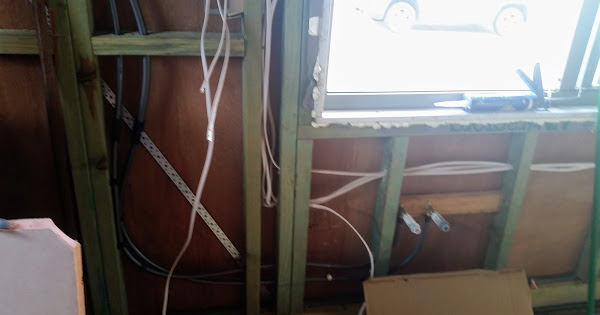
So with that, and my lighting design sketched out, I completed the rough-in which involves drilling lots of holes in studs (eep) and running cables. One circuit for power, one for lighting, all going back to an internal switchboard in the main living area.
Google Photos

Insulation
With wires and plumbing in place, time to install insulation. Chatting to @riumplus decent insulation was always going to be a challenge with only 70mm cavity. The highest r-value per cm insulation that I wanted (polyisoocyanurate or PIR) cost 10 times as much as regular pink batts. I had also considered closed-cell spray foam, which is popular in the US, but not so in Australia, driving the cost up here. And it can also be toxic if not installed properly so the lack of experience here gave me pause.
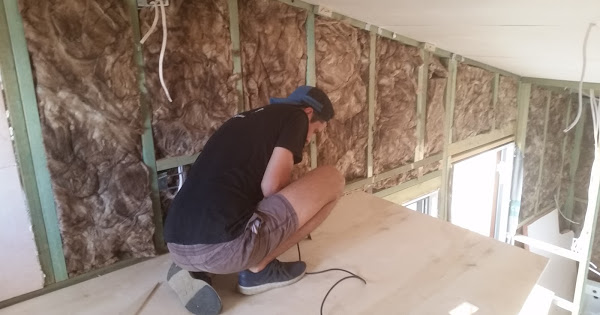
In the end I decided on high density Earth Wool. It’s not ideal but it’s cheap and the R-value is only slightly worse than PIR, not 10 times worse.
For the roof however I did go with something more expensive. Thermoset closed cell phenolic insulation 50mm wide with reflective foil and a 40mm air gap. That combined with the insulated roof sarking should provide a total Rvalue around 4.
Anyway this is just a brief discussion on my insulation design and considerations. If you want more detail, just ask.
Installing insulation is easy (but itchy): just cut to size and stuff into the cavity between studs, minimising gaps but not compressing the insulation. For the rigid insulation, I filled any gaps with expansion foam.
Google Photos
_Thanks to @alandonnelly7 for the help installing the lining _

Internal lining
Nearly all homes use plasterboard as their internal lining. But that doesnt work for a mobile tiny house as it is too brittle and would likely crack. I had always planned on using plywood (lighter than MDF and cheaper than PVC panels) but 20-something sheets of 9mm ply quickly adds up in weight. So I found a lightweight alternative: Falcata ply is about 40% lighter than standard radiata pine plywood and not much more expensive at around $34 a sheet. I’m really glad I chose it while lifting full sheets over my head to fix to the ceiling.

Google Photos

Next steps: prepare the lining for painting by filling all the joins with putty and sanding back. Lining the bathroom - this takes more consideration as it is a wet area. More on that in the next post.

(I have more photos but I cant get them to import well from Google Photos. If someone could show me how to do that I’ll put more pics in)

8 Likes

Hi,
I saw the tiny house at the hackerspace when it was at the frame-with-cladding stage. You are doing a great job. Very much enjoying seeing your progress here.
Cheerio,
Anne

3 Likes

No problem it was a bit of fun, its looking great! keep up the good work

Been a while since my last update but much progress has been made! In fact so much, I’ll do multiple posts.

Painting
I decided to paint the wall with a couple of coats before any of the fitout gets done. What ensued was a week long effort of filling all the joins in the plywood sheets with putty, sand back, refill a bit more, sand back etc etc until I had to just call it good as and start painting. Some of the joins are still slightly noticeable but not enough to bug me. A final coat of paint will go up when fitout is complete.

Google Photos
ooh pretty walls

Bathroom Lining
First step was to waterproof the floor as per code. I put down a coat of primer, then silicon over all the ply floor seams and the wall floor junction, then waterproofing tape over the same, then a coat of waterproofing primer, then two coats of waterproofing membrane.

Google Photos

Next step was the install the bath (yes I have a bath in my tiny house! and yes, I just fit in it). I built the frame (tricky with a triangular bath) and recessed the studs slightly so the bath edge would be flush with the wall. Acrylic baths have to be supported around the edge and also underneath because they’re kinda flimsy. So I mixed up a bit of concrete (as little as possible being minfdul of weight) and set it around some timber blocks on the floor then pushed the bath into it so the whole bottom of the bath would be supported.

I had to get a bit creative with the wall lining for the shower area over the bath. Most aussie houses use fibre cement sheet with tiles, which is both heavy and brittle; not ideal for a mobile house. I could have used an acrylic shower lining but could not find one to fit. So I decided to use the same stuff that is on the outside of the house: colourbond steel. Lightweight, strong, waterproof and relatively cheap. Instead of the standard profile, I used miniorb. For waterproofing, I first lined the walls with some leftover sarking, then custom folded some flashings to go into the corners, and over the top edge of the bath: ensuring any water that gets behind the corro will get directed into the bath.

bath in frame and corro…after all that work I decided I didn’t like the colour and will change it to the same colour as the house exterior

The tap and shower head fittings need to be detailed out but I have a plan for that…more details in another post. The rest of the shower wall above the corro will get lined out with the same weatherboard as the house exterior.

Next steps: interior fitout! Kitchen, stairs, shelving, couch etc.

2 Likes

And just like that…internal fitout is largely done. Well not really, it took me a few weeks but I’ve been that lax in my build log updates.

So I had all these plans for my internal fitout…until I reviewed my weight calculations. I’ve been keeping track of the tiny house weight by calculating the weight of everything that has gone into it. What I had understimated in my original design was the weight of flatpack cabinetry. Stack a few Ikea boxes together and add a standard benchtop and you get a kitchen that easily weighs hundreds of kilos.
So I regretfully scrapped my plan of using the secondhand kitchen cabinets I got for free and decided to build them myself…from scratch. I have had ample opportunity to regret that decision, but managed to build a complete kitchen 1/5th the weight of a flatpack one.
Started by framing out the cabinets in pine using pocketholes. The open shelving area got lined in ply but the rest was left open. I then fitted drawers and shelves.

Google Photos

To further save on weight, I decided to use plywood for the door/drawer fronts instead of melamine particleboard. I knew I wanted my cabinets to be black so figured I would try formply (film faced plywood usually used for concrete formwork). I also decided on premium Hoop Pine plywood for the benchtop - half the price and a fair bit lighter than an Ikea laminate bench.
I actually quite like the look of plywood edging so I have featured it throughout the kitchen: cutout handles on the drawer fronts, added edging down the open shelving area and left the benchtop edging exposed. All the ply and edges were sealed with a a polyurethane sealer.

Google Photos
the mostly completed kitchen…another drawer has since been added, and waterfall ends for the benchtop

Pros of my custom built kitchen: its at the perfect height for me (higher than normal), the plywood benchtop looks awesome IMO. Cons: the formply gets dusty and scratched easily, a not-perfectly square frame in a not-perfectly square house means the doors are all a bit wonky…but only if you look closely.

The stairs of DOOOOM
Just kidding…they’re solid AF. Courtesy of @Svenska who designed and built the frame.

testing his work

The frame is 20x3 steel bar with plywood steps. At first the plywood flexed quite a lot, so I reinforced it by gluing a screwing more ply to the bottom of each step. I also routed out a groove for aluminium channel to protect the edge of each step.

mostly completed, just needing some finishing work

The multifunctional couch of awesomeness
A single bed folds out to L-shaped couch folds out to double bed. And lifts up for storage. Beat THAT Ikea! (methinks I’ve been spending too much time on the house).
Anyhoo, a fairly simple design that was stolen from similar RV builds and modified for my needs. A simple frame with a fixed section and a sliding section with separate slats. A picture demonstration will make more sense…

Single bed mode
Google Photos

Couch mode
Google Photos

Double bed mode
Google Photos

I will also add some hinges so the whole slat assembly can be lifted up to access storage area underneath (also accessible from the holes in the front).

Next steps: Install the slide out pantry. More finishing details. Change out the corro in the shower and install the bathroom vanity. And later - install the lighting and powerpoints :smiley:

It’s the final push. All things going well I will be living in my tiny house by mid-end August.

4 Likes

I love your work… that black formply and timber combo in the kitchen looks fab!