Popcorn Vending Machine

Note to people who have arrived here via Google: if you own one of these Rowe Popcorn Machines, I’d love to get in contact with you! We’re missing some parts in our machine and would love it if you could measure some parts for us, or even just take a few reference photos. And I’m happy to offer advice about some of the things I’ve learned about this machine too. Sign up for an account on this forum (it’s free), click my username & send me a Private Message and I’ll hook you up with my email & phone number.


For those new members who don’t know what I do around the space, I’m the guy who does the majority of work stocking our Drinks Machines with all sorts of fancy flavours. And for those people who don’t know me personally outside the space, I love popcorn. Well I was looking at some things online recently, and… long story short, I now own an automatic popcorn popping & vending machine. :smiley:

(I have absolutely zero regrets making this purchase)

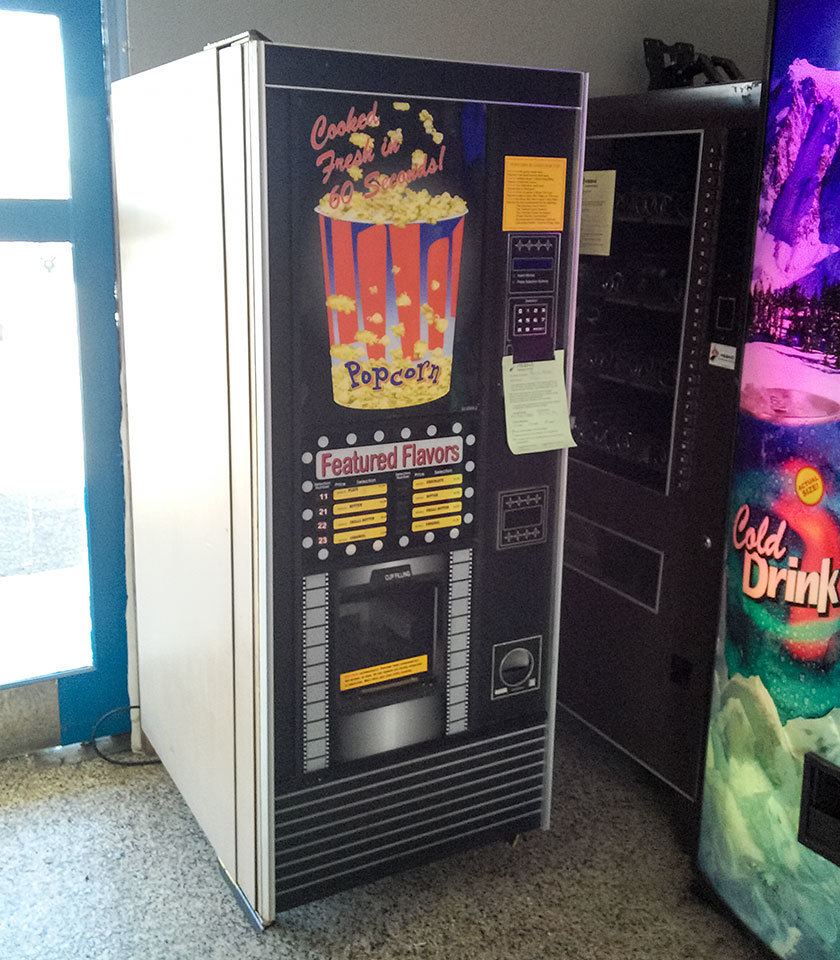
The machine in question is an automatic popcorn popper/cooker and vending machine, a Model 290 “Silver Screen” unit made by Rowe International. Getting it to the space was a bit tricky, because it seems I underestimated my purchase - this thing’s 6 feet tall and weighs around 230 kilos! I’d like to give a huge shout-out to @Svenska for assisting me with the pickup with his ute, and @jace as well for being another pair of hands unloading it into the space.

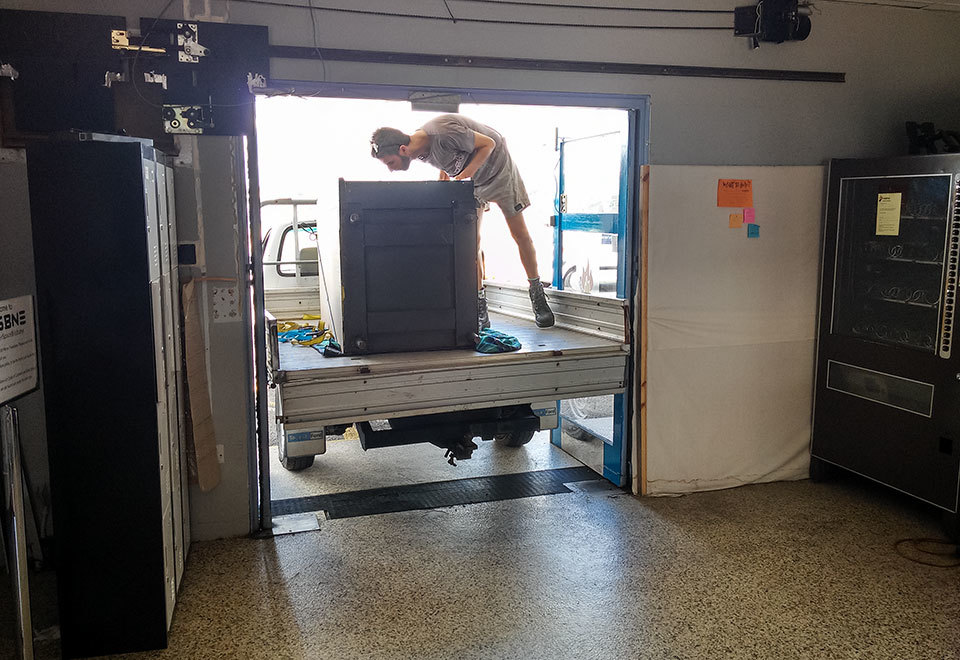
(fun fact - it’s a VERY tight fit, but a ute’s trailer will juuuuust fit through our front doors)

So, what’s the plan? To get this machine running and serving fresh hot popcorn at the space! :smiley: To do this, a few things need to happen. If you want to help out, depending on the task feel free to either just jump in or ask me for direction!

  1. Cleaning - clean the machine of the bulk of the dirt, dust, grease, grime, and whatever other gunk is inside it. Wanna help out? The exterior of the machine still needs cleaning! The right side and the rear in particular are filthy, and you’ll go through more than one bucket of hot disinfecting water cleaning them out. Also the very bottom of the machine needs to be cleaned with a scraper or paper towels or something, because it will just destroy chux/sponges with single wipes… maybe put some oven cleaner on it or something super strong. Basically the aim for this step is to make it such that your hands don’t get dirty while working on the machine, aka to remove any dust that would be a health hazard when just working on the machine (not when it’s operating), as well as anything that could be fire hazard to the heating elements etc.
  2. Electrical work - replace the main power cord (it’s been crushed and I don’t trust it), clean a bunch of the connectors, reconnect the transformer and the line conditioner, check some things individually. Check as many things as we can think of before we apply power for the first time. In particular anything on the bottom of the machine, and the flavouring metering dispensers.
  3. Sterilising - this time, the aim is to sterilise all important surfaces to be food safe. You can probably see how this is a separate step from the first one - this one calls for sterilisation, while the first step calls for just general cleanliness.
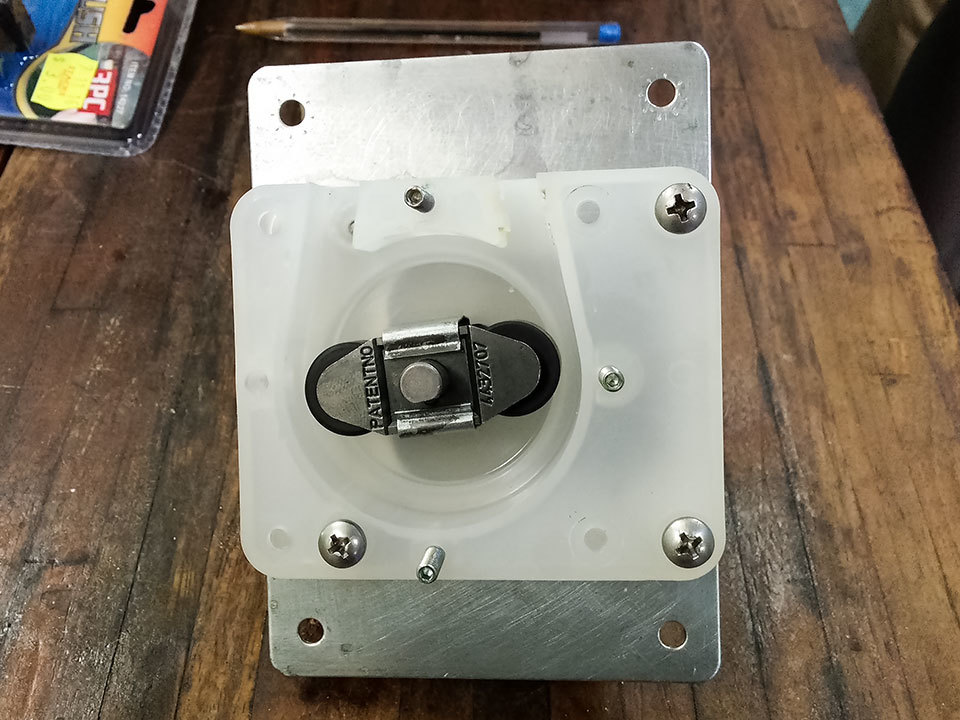
  4. Software/hardware hacks - find some guides or manuals on this machine, if we can. Reprogram it, if at all possible. Hack together bypass systems for whatever is necessary. Build a new coin holding metal container, a new grill (or floor) for the popcorn container to sit on in the collection area, walls/ceiling for the collection area, and bypasses for any systems we can’t use (like perhaps the cup vending part or the flavouring metering dispensers or the flavouring mixers). This also includes stuff like changing all the settings to be correct for what we want, notablystuff like making sure the auger dispenses the right amount of kernels per serve, since whatever it’s set at right now is likely wrong as there’s such variety between kernels.
  5. Acquire supplies - I have 100 paper popcorn bags as a test that have already arrived and I have 3 kilos of variously flavoured salts coming in the mail. This machine uses liquid oils for flavours so I may not be able to use these salts, I have to see if I can DIY mix them up or not. I’ll also need a few kilos of raw kernels designed for popping - so far it looks like the cheapest price is the small 300-400g bags at my local supermarket.
  6. Profit! - well, once it’s paid me back that is. This is a personal purchase of mine, not a piece of equipment owned by the space. This way we’ve avoided any issues about buying something when we’re short of funds, getting reimbursement for something that was bought at an auction without a membership vote etc, and most importantly it gives me a big dangling carrot as an incentive to get this machine running asap. Once it’s earned enough that I’ve covered costs, then the space will be getting profits and possibly even just outright donating the machine to the space too. While I’m at it, I’m totally happy to relocate this machine somewhere else while I’m working on it, or others can do that themselves if it’s in the way and you need it moved right that second - I recommend the pallet jack from a 45’ angle.

If all else fails, this purchase wasn’t a complete loss because the coin counter inside this popcorn vending machine (a CashFlow 560 24V) is close to a drop-in replacement for the one in the Vigo drinks machine, except newer and capable of different prices per line. Those are many hundreds of dollars each, even second-hand, so this specific machine still has value to HSBNE.

I’ll be posting plenty of photos of the popcorn machine’s insides and other details soon, but for now, if you’re curious about how this machine works I totally recommend you check out its patent. Our popcorn machine is an almost identical copy of the machine pictured in that patent, which features some handy exploded views, cutaways, sectional diagrams, and explanations of how everything works. :smiley:

7 Likes

That’s fantastic, though I just started working on the machine behind it again :frowning:

Open to ideas where we could move it to, the only though I have presently is on the other side of the door.

1 Like

Awesome work!

happy to help with some cleaning. I’ll come say Hi on Tuesday if you are around.

1 Like

I cleaned most of the base of the machine (the degreaser in the machine shop does wonders), however forgot to do under the power conditioner.

Also checked the mains side of the machine, the power lead is definitely faulty so I’ve put in a temporary IEC lead until we can replace the main lead.

Switches on the machine:

  • power switch top left, controls most stuff
  • little power switch on door controls the lighting
  • little circuit breaker on door presumably for lighting
  • 2x circuit breakers on the pull out control board

Powered it on and it seems to function. Had to disable the flavour dispensers for it to not throw an error. (In pop cfg menu)

There’s a pretty complex control menu in it which you can access when the door is open (changing popcorn settings like amount of popcorn, prices, seeing how much money it’s taken, number of times it has dispensed, input/output testing, and a lot more). I haven’t quite figured out how to navigate but a it seems to be something like this:

  • reset+9 - back
  • reset+8 - select
  • reset+7 - toggle (e.g. on/off)
  • reset+0 - navigate forward/back
  • reset+1 - navigate forward/back

You can also select the menu options with the numbers, which seems to be different to what you can access with reset 0 and 1. Not quite sure what’s going on there.

Stuff till to do:

  • Replace power lead
  • check function of pump motors
  • see if fluorescent light behind popcorn graphic can be fixed
  • replace chasing incandescent lights
  • lots more
  • clean under power conditioner

Please don’t make any changes in these menus unless you know what you’re doing or document it here!

3 Likes

Mike and I moved the popcorn machine to the other side of the door so we’re all good.

Whatever you do, please don’t open the machine and touch things. Mike has been sterilizing the stainless parts and it’s very easy to start pointing out how the machine works and end up touching the sterilized parts.

This post is going to be a bit big. That’s because I’ve made a lot of progress with this popcorn machine, but I tend to post my updates in the Slack vending machine channel. Check it out if you want to get involved with helping repair this machine (I have some easy tasks I’m keeping just for others who want to assist so I can focus on the trickier parts), or if you want more information than what I post here, or even just up-to-date coverage!

Just a minor correction to what Nog said above - I’m still going with the step 1 cleaning, I haven’t sterilised any surfaces just yet. That will happen later on when I basically clean everything all over again… And it’ll be much quicker the second time since I’m not removing decades of gunk & crud from everywhere! For those who might be concerned about eating things cooked in a vending machine of unknown origin or past owners - I’ve actually got more than a passing familiarity with the food safety & handling standards, since I was a co-founder of a food-based start-up after all. What’s more, I happen to be rather picky about cleanliness with rather high standards myself (you might’ve seen me cleaning the space almost every week), so I can guarantee this vending machine will be spotless by the time popcorn is offered for sale. :popcorn:

To give you an example of the things I’m cleaning inside this popcorn machine, here’s part of the stainless steel chute after the hot air popper, half-way through its cleansing scrub:

(clean vs original… So many years of baked-on oil, gone for good!)

This popcorn vending machine is incredibly modular and it’s actually very well designed, WAY better than both our drinks machines. It’s actually been pretty easy to access & clean most surfaces, since almost all parts are just hanging off hooks and most of those parts are just folded Stainless Steel that’s being held together without any screws, bolts, or other such things that would be difficult to clean. I’m almost done with the first pass of all the relevant areas inside the machine, I only got the kernel holder & dispensing auger to go.

(Power control board on the top left, CPU boards top middle, corn dispensing auger top right, corn kernel holder mid-left, power transformer lower middle, coin acceptor lower right (a CashFlow 560 24V whose most recent service expiry was July 2000, by far the most-recently-serviced coin acceptor we have). All so easy to access thanks to these pull-out drawers)

The bottom surface has been completely cleaned of gooey gunk and I’ve removed all the old kernels from all their hiding places inside the machine. Almost all wingnuts are accounted for - we have 15/16 (though one is damaged and unusable), and we should be able to make do with this for now. Also, there were a lot of kernels hiding in some places. As in, here’s my dustpan once I was finished:

(SO many unpopped kernels inside the machine)

The search for documentation about this machine has turned up pretty much nothing other than that patent application (including such attempts as checking Rowe International’s website’s history on the Internet Archives). @sjpiper145 managed to find the contact details of one of the original inventors of this machine and emailed him - he sent us a brochure about the machine and he’s going to see if he has anything else stashed away anywhere. Thanks, Steph! :smiley:

rowe_popcorn_machine.pdf (471.8 KB)

This thread is now the best source of information about this Rowe Popcorn Machine on the entire internet. Mwahaha. :wink:

All the electrical connections have been cleaned with contact cleaner, and almost all the electricals are in a good state. A few things need some work (like the lighting and the missing flavour mixers). The damaged power cord for it still needs replacing. I’ve bought the necessary parts to do this job, just have to do it. The fluorescent tube is dead, not sure if it’s the starter or the tube, but we don’t have any 110V stuff left in the other vending machines to test with. I think it’s best to just replace this with LED strip, just like we did with the two drinks machines. Someone else can totally jump on this task if they want - since it’s not critical to the machine’s operation I won’t be doing this myself until everything else is done. There’s two separate jobs that need doing here - the sheet steel backing plate needs to be painted white (why the reflector was painted a dark colour I don’t know), and the tube needs to be replaced with white LED strip & a 110V AC -> whatever the LED strip uses power supply. For reference, the current blown tube is a Philips F20 T12 Cool White 20W 24 inches/60.96cm long.

(Fluorescent tube reflector that needs to be painted white)

(Dead fluorescent tube that needs replacing with white LED strip)

I’m definitely going to need some help fabricating a few missing parts for this machine and they need to be made out of food-grade Stainless Steel. @Boo has offered to have a shot at acquiring some and fabricating the parts for me. Thanks, Meka! :smiley:

I may have found a source for reasonably-priced replacement cardboard cups. Need to check they’re the right size for our machine, when the person gets back to me with the dimensions. Failing that, I’ve bought 100 paper bags we can test with once our current stockpile of ~160 cups runs out. For future reference: the machine officially uses 32 oz cups, which are 0.94 litres, and they measure 11.5cm in diameter at the top and are 14cm high.

(@Svenska posing with the automatic cup dispenser mechanism pulled out. The brochure advertises “one-handed cup loading”, which is actually doable if you know how to load it. Impressive!)

I’ve acquired some food-grade vinyl tubing to replace the existing flavour dispensing tubing. There’s no way I can adequately clean the existing stuff, it’s too far gone, so it’s just all getting replaced. Still on the hunt for appropriate-sized nozzles for this tubing though, but I need to test if it works properly with the peristaltic pumps first. Need to have the tubing that goes through the pumps easily replaceable with connectors, because it’s going to wear out every so often.

Speaking of, I’ve been working on servicing the peristaltic pumps that the machine uses to dispense its flavours. It takes me a few hours per pump, but the end result is super clean and all accessible parts have been properly lubricated. Have some before & after photos of the second pump from the left!

(Before cleaning - so many different kinds of gross things and the mechanism barely moved it was so gunked up)

(After cleaning & lubricating - so much better looking and the mechanism now freely turns!)

I’ve acquired 7.5kg of the right kind of popcorn kernels from this machine. This took visiting five separate supermarkets. My calculations say this will do us for around 200 servings of popcorn, so we should be good for a while.

I ordered 2.5kg of powdered flavourings for me to test with trying to make my own flavours… and unfortunately, I couldn’t make them work. They’re designed for oil-popped popcorn, not air-popped popcorn. I’m trying to source alternatives that will work with this machine, but in the meantime… If anyone reading this wants some actual cinema-style butter salt seasoning, chocolate glaze seasoning or caramel glaze seasoning, hit me up! I’m happy to parcel it into smaller quantities in zip-lock bags and I’ll charge a flat percentage of what the bulk amount cost me. :slight_smile:

Finally, I’d like to say something very important: if you open the machine, unless you have a reason to do otherwise and you’re going to post about it in this thread, please put everything back in the EXACT configuration you found it. Someone has already opened the machine and not put everything back the way it was, and it’s only because I took reference photos when I first bought the machine that I spotted something was wrong and could fix it. Please don’t cause me to waste my time finding where things are supposed to go. :stuck_out_tongue:

4 Likes

What’s this? Another update less than 24 hours later? I told you people have been working hard on this machine! :wink:

The dodgy power cord has been replaced with a new one thanks to @Thermoelectric . Cheers, Beau! :smiley:

Beau’s also been mapping out the options in the control panel. We have quite a bit of it figured out so far. It seems it does have a battery backup in it, since it had the correct date & time saved within it. Who’d have thought so!

I’ve finished cleaning out the last two peristaltic pumps for the flavour dispensers. Took me an average of 2.5 to 3 hours per pump for the 4 of them… That was an awful lot of time spent cleaning. Here’s the last one, the worst of the bunch:

(Before cleaning - so grody)

(After cleaning - nice and pristine!)

In fact, here’s a nice animated .gif of one of the pumps in action! Check out that spinny action! If the below embed doesn’t work (I’ve not tried embedding a .gif in Discourse before), try clicking this link.

Now for some bad news - I was using orange oil to remove some sticker residue from the front of the machine, wiped over a label, and… the black text came right off. Damnit. :frowning: Looks like I’ll have to print up a replica label, laminate it and stick it over the top of this sticker to hide it.

(One wipe and most of it disappeared. Strong stuff, just not so good when applied to the wrong area. :frowning: )

I’ve disassembled the popcorn kernel storage bin and the dispensing auger/spiral for cleaning. I needed to leave them somewhere safe & relatively dust-free to dry out, so they’re sitting in the bottom of this machine. Please don’t disturb until I have a chance to reassemble everything. :stuck_out_tongue:

(Parts drying on the bottom of the machine)

4 Likes

It’s been another busy week repairing this popcorn vending machine. The kernel storage & dispensing auger have been reassembled. I’ve cleaned everything & everywhere well enough that I’m now satisfied enough with its state that I’m going to say item #1 in getting this machine running, the general-purpose cleaning, is officially done!

Also, almost every single electrical component has been tested and the contacts/plugs have all been sprayed with contact cleaner. With the new power cable on the machine, I’ve run an extension cord from the power point above our front door to supply power to this half of the lobby. At this point the only thing left to go is a full teardown, service & recalibration of the coin counter (a CashFlow 560) and then item #2, Electrical work, will be done too! To prove that point, here’s an animated GIF of the machine being turned on:

I’ve acquired some polishing compound to help with sterilising this machine, I just need the buffing wheel to go with it. Also,I’ve ordered some LED bulb replacements to test with replacing all the dead bulbs in this machine. And speaking of lighting, I’ve spray-painted the back reflector of the fluorescent tube area a white colour. This doesn’t mean much right now given the tube is broken & needs to be replaced with LED strip, but it was a job that I could do pretty quickly.

(It’s not a perfectly even coat because it doesn’t need to be perfect, but this will help bounce the light around quite a bit better than the dark green colour it was before)

@sjpiper145’s contact with the popcorn machine’s original creator at Rowe International has turned up two more documents - a Bill of Materials for ordering spare parts for this machine (you can’t order them any more but at least we know the official names for stuff now!), and a few pages of the operating manual & the exploded parts manual. There may be more to come; here’s hoping!

silver_screen_1.pdf (145.5 KB)

silver_screen_2.pdf (805.0 KB)

I’ve lubricated everything involved with the door’s original locking mechanism, which was completely seized up when we got this vending machine. The mechanism now moves smoothly enough that I’ve started “locking” the machine properly (just turning the handle, since there’s no actual lock mechanism present). I’m going to see about getting a replacement lock cylinder for this machine, as well as a proper lock for the Vigo drinks vending machine while I’m at it (a proper lock would seal its door better).

(the lock handle is no longer taped up, because it actually works!)

I’ve acquired a few square metres of food-grade Stainless Steel to attempt replicating the missing parts in this machine. @Boo is working on this for me, and he’s knocked together a rough plastic prototype for testing purposes. Thanks, Meka!

I have a source for some replacement cups and perhaps some other stuff too. I’m still working on getting the flavours somehow, I haven’t given up on that part just yet. We’ll see what my contact can do for me!

(ALL the popcorn kernels!)

So close, and yet a lot of stuff still do to before it can start vending… But we’re getting there!

3 Likes

I’ve been making so much progress on this machine that I’m so far behind in documenting it. Time to fix part of that! Warning, this may get pretty long.

First off, I’ve acquired a power meter for measuring how much electricity this machine uses and how much I should donate to the space to offset this. Yes I’m accounting for everything to make this all very proper. :wink:

Secondly, I’ve ordered & acquired a tubular/cylindrical lock that hopefully should fit this machine. FYI, a copy of its key will live on the vending machine keyring in the server room - I’m not locking everyone out, but I don’t exactly want people touching random things with their unclean fingers given this machine’s insides are supposed to be food safe. :stuck_out_tongue:

Thirdly, I’ve acquired some more cardboard cups for this machine! I have 500 right now, another 500 on the way, and I may (or maybe not) be able to get more in the future. But even better, these aren’t just any old cardboard cups - these are the exact ones made very specifically for this exact popcorn machine. Each stack of 50 cups fits in the machine with less than a centimetre of clearance, they’re that good a match. So we should be good for cups for the immediate future!

(224 cups in the machine - old ones on the left, new ones on the right. Plenty of cups for us!)

Fourthly, I’ve acquired some suitable base flavour oils for this machine. 15 litres of butter flavoured oil, in fact! A lot of this stuff is apparently concentrate so it should go a very long way. Now to add some extra stuff to make some proper full-on flavours! I need to do some test prototyping with ingredients and ratios, but as soon as I have a couple finalised flavours then we can cross item number 5, Acquire Supplies, off the list!

(4 gallons, aka 15 litres of butter oil. Only needs some more flavour additives and then we’ll be all good!)

Fifthly, I’ve acquired some spare parts in case anything in this machine breaks down. I have a spare peristaltic pump for the flavour dispensers, and a spare hot air popper. The motor to the extra peristaltic pump needed some work, but the always-talented @Boo fixed the bent iron plates and made it work again. Thanks, Meka! :smiley: Oh and if you’re ever curious, here’s the patent application for the peristaltic pumps so you can see how they work & how they’re assembled.

(Extra hot air on demand. Something something really bad joke about politicians something.)

Sixthly, @Boo was working on creating a replica of the missing cup dispensing tray area. This was a lot of work done because we never thought we’d get an original… Well sometimes magic happens and I managed to get an original! I’d like to give extra special thanks to Meka for putting in all this effort to prototype a cardboard & plastic replica because it’s amazingly close to the original, especially when we didn’t really have good photos of what it should’ve been too.

(Meka’s prototype created on the left, the actual part on the right. He hadn’t seen the original when he created this, only the tiny sketch in the patent application & measured the hole left in the machine)

Seventhly, I’ve acquired 5 of the original flavour bottles for this kind of machine. Yes really!

Eighthly, I’ve also managed to acquire 5 mixing motor assemblies for this machine too! The machine takes 4 bottles/mixers, but not all of the ones I’ve acquired are in perfect condition. Of the 5 mixing motors, 4 work, but the fifth has extra friction in it and I don’t think I can repair that one (but I haven’t tried super hard). One of the mixing motors has a broken lid on it too - we can make do with it, but for now I’m just gonna designate that a spare for emergencies. Of the 5 plastic bottles, 2 of them are in perfect condition, 2 of them have minor cracks, and the last 1 has a major hole. Repairing these will be tricky because they’re made of old HDPE plastic. If you’re not familiar with how HDPE ages, it becomes very brittle and few glues stick to it properly - they either just outright don’t properly adhere, or they slowly develop leaks that mean they’re not watertight, or they introduce extra stress points where the glue ends due to different thermal expansions and you end up with even more cracks than you started with. Thankfully I have some experience with repairing old HDPE plastic in the form of the windshield washer fluid bottle on my DeLorean :wink: The correct solution is to thoroughly clean the surface, cut out a suitably sized piece from a 2L milk jug which are also made of HDPE (all the curves around the handle make it easy to match complicated shapes), and use a hot air gun to melt the plastic patch in place. This also gets around the problem that there’s very few glues that are also food-safe for constant immersion within edible liquids, too. At this point I plan to get the machine started with just 2 flavours, and I’ll expand it to 4 once I’ve repaired some of the other bottles.

Ninthly, to clean out the metal suction pipes that go in the flavour bottles, I went to a craft store and bought some pipe cleaners. Yes that’s right, for the first time in my life I bought some pipe cleaners because I actually had some pipes to clean. This made me unreasonably excited :stuck_out_tongue: Cleaning the pipes was also super satisfying too because the gunk inside them all came loose with very little effort - insert white pipe cleaner, remove icky brown one.

(For the first time in my life I’m using pipe cleaners to clean a pipe. Shock and horror! :stuck_out_tongue: )

Tenthly, I’ve begun work on one of the final passes for sterilising the components in this machine. In the phase 1 cleaning, the only way I could remove some of the gunk from the stainless steel was with a wire brush. This introduced small scratches to the metal, and scratches are really good for collecting future gunk and breeding bacteria. There’s a few ways to make Stainless Steel completely food-safe, and I chose to do the polishing method. These pieces have been left in the bottom of the machine in a pile, so please don’t touch them. Here’s a piece half-way through its polishing job - compare this photo to the half-and-half one I posted earlier during the initial cleaning phase!

(A reflection of the popcorn machine in part of this popcorn machine itself. Whoa. The final finish will be even more mirror-like than this, too)

I could say more things I’ve done, but at this point I’ve spent hours collating info & photos to write this post and I think ten things is enough for now. Until next time! :smiley:

6 Likes

3 Likes

Once again my rate of progress has exceeded my rate of documenting this popcorn machine’s status. So here’s another big update!

The tubular lock arrived and it was a perfect match. I’ve fitted the lock to this machine so that it’s now secure. Note that this is not my attempt to lock people out, but something that needs doing because aside from food safety reasons, just like the drinks machines this thing will have money in it. In fact, it has some coins in it right now! In case it’s ever needed in the future, a copy of the key is on the vending machine keyring in the server room (and I’ve labelled it along with the similar one to the Cold Drinks machine key so you can tell which is which).

(It’s time to lock and load)

All the blown incandescent light bulbs inside the machine’s flashing light display have been replaced with LEDs. There was only 4 out of 40 bulbs still working, and with bulk LED prices it was worth the swap. The ones I bought were maybe half a millimetre too big on each corner, therefore each LED bulb had to have its four corners individually trimmed so they could fit in the holders. That was a fiddly job. But hey, lookit all the blinky lights now!


(Blink ALL the lights!)

The dead fluorescent tube in the top half of the machine has been replaced by LED strip. The LED strips are attached to the metal backing plate, and there’s a removable connector in there too, so if anyone has to remove this panel in the future be careful and make sure you unplug it before you remove the sheet. It’s lit up the front display perfectly though; painting the backing white really helped to even out the light distribution.

(So much light consuming so little power… LEDs are amazing)

The CashFlow 560 coin acceptor in this machine has been completely torn down, all coin-touching parts were cleaned, all electrical connections were sprayed with contact cleaner, then reassembled. No idea how well this thing will or won’t work, but I thought it best to start with the best possible state I can make it.

An interesting fact I’ve discovered - this popcorn machine uses different core wiring in different parts. Yes really… Have a look at these two wires that were close to eachother. Neither has been tinned with solder, they really are different metals. The outside labelling on the wires are identical, too. Weird.

(bi-metallic wiring)

I’ve thoroughly cleaned and serviced the flavour dispensing bottle & mixing motors. To start off I’m probably going to have only two flavours on offer, and I’ll repair the other plastic bottles & bring in extra flavours some time in the future. I’m not looking forward to trying to repair the plastic bottles, it’s a pain of a job, but ya gotta do what ya gotta do.

While I was able to acquire replacement mixer motors and flavour storage bottles, I wasn’t able to acquire the cables to plug them into the machine. This is a problem because the motors have 2-pin plugs, but the sockets they’re supposed to plug into are 3-pin sockets and there’s no way to force them due to the plug shape. I traced the wires from the sockets back to their sources and thankfully, one of them went straight to ground, and the other two were AC active/neutral. This machine seems to switch both the active and the neutral wires, so sometimes both are 110V AC, sometimes only one is 110V AC while the other is 0V, and sometimes both are 12V AC (which I assume should be 0V but it’s higher than that because they’re floating). Thankfully the flavour mixing motors are AC too, so there’s no way to wire them in backwards! A few hours of trawling DigiKey & studying spec sheets later, suitable connectors were found for me to DIY my own cables. I made 4 while I was at it so we’re ready to go with the extra flavours once I have those flavour bottles repaired.

(How to inset a 2-pin plug into a 3-pin socket - build your own adaptors, of course :wink: )

I’ve ordered some silicone tubing for the peristaltic pumps. Unfortunately it’s coming from China, and shipping is taking forever. I’m not even 100% sure if it will be suitable for this popcorn machine, but the cost of buying it from China was literally close to a thousandth the cost of buying some locally since it’s not a common inner/outer diameter tube size. At this point, not having the silicone tubing is the main holdup with the machine as most of the other stuff is almost perfect. I’ll keep working on improving the minor little things until it arrives, but hopefully we should be all enjoying freshly-cooked popcorn pretty soon! :smiley: :popcorn:

5 Likes

There’s so many things I should post and I don’t know what order… So I’m going to start with the boring stuff first in this post, and the more interesting stuff in a secondary follow-up post. :wink:

Remember the plugs I had to order online to make the flavour bottle adaptor cables in my previous post? Well you’ll never guess what I discovered sitting in the random electronic parts bin at Reverse Garbage… The exact right plugs I needed. Go figure. Oh well, too late now :stuck_out_tongue: While I was there I also picked up some thick HDPE plastic jugs, for reasons I’ll go into in a moment.


(just my luck to find these in a bargain bin after I had to order a bunch from overseas)

Of the 5 flavour holding bottles I have, 3 were broken (for reference, the machine takes 4). I searched far & wide and couldn’t find replacements for these bottles anywhere, so my only option was to repair them… Except these bottles are 20+ year old HDPE plastic. If you’ve never dealt with old HDPE plastic before, it’s trickier to mend than you’d think, mostly because it almost behaves like a layered material that’s separating. It’s almost impossible to glue shut - any soft glue you use won’t stick properly to the HDPE and will leak after a few months. Any hard glue or epoxy you use will likely have different thermal expansion properties and will introduce stress fractures where the glue ends, leaving you with a ring of multiple cracks where you previously had just one. And if the bottle has to be repaired in a food-safe manner, you’re pretty much out of luck because food-grade glues designed for constant submersion in acidic food are few & far between even in the best of occasions.

Fortunately, there’s a trick that I learned from repairing a worn HDPE plastic bottle in my DeLorean… Take a milk jug or similar container made from the same grade of HDPE plastic, cut an appropriately-sized patch, then use either a hair dryer or a hot air gun to melt the plastics together. This is pretty much the only reliable way to do it that won’t leak on you a few weeks or months later, and the end result can still be food-safe. This is a tricky process to get right so if you ever have to do it I highly recommend you practice on some milk jugs first before you try it on the real thing. And as another hint for you, the best temperature for welding HDPE plastic is right around the point where it goes fully transparent (and becomes super soft & floppy with zero structural strength so make sure everything is properly supported). Don’t take a piece from a donor bottle that’s on a seam as it may separate on you when heated up. Oh, and the curved areas around the handles on jugs are super handy to find an area that has matching curves to make with whatever surface you need to patch, what with all its in-and-out bits.


(Two of the patched bottles, with the donor container on the right. You can see the middle one had quite a decent crack in it that’s now fully repaired!)

The silicone tubing for the peristaltic pumps took over a month to actually get here, but it’s arrived. Unfortunately it was the wrong outer diameter, it was too small by a single millimetre… But fortunately it was the correct inner diameter. I’ve padded the peristaltic pumps with a few thinly-cut slices of cardboard, and they now work perfectly! I still have plenty spare for at least one full replacement of every piece of silicone tubing (it slowly wears out from all the constant compression it undergoes while pumping, regular replacement of this tubing is unavoidable).

I spent the better part of a day mixing up ingredients to put in the flavour dispensers. This process involved a lot of trial and error, altering ratios and tasting the resulting mixture. The mixtures I’ve got in the machine aren’t perfect, but for now they’re good enough to get us going while I fine-tune the recipe. I could’ve used peanut oil for a better flavour profile, but I shied away just in case anyone has peanut allergies and opted for a canola oil base, with a butter oil imported from America to give it a smooth buttery flavour, plus whatever additives the various flavours required. There’s a million and one things in this machine that can be calibrated and I can’t reasonably eat a cup of popcorn after every single alteration to test the new settings, so feedback would totes be appreciated - just note down the day & time of your order so I know in case I’ve already tweaked the values since your order. :slight_smile:

1 Like

And now for the more interesting post. Because, fellow hackers…

:popcorn: :popcorn: :popcorn: :popcorn: :popcorn: :popcorn: :popcorn: :popcorn: :popcorn: :popcorn:

WE HAVE POPCORN!!!

:popcorn: :popcorn: :popcorn: :popcorn: :popcorn: :popcorn: :popcorn: :popcorn: :popcorn: :popcorn:

https://www.youtube.com/watch?v=bWeuqq7je1w (The very first cup to be cooked - this machine is automatic, systematic, and hydromatic!)

(the resulting very first cup of popcorn produced from the machine. I already ate some before I remembered to take a photo. It was delicious :smiley: )

The official unveiling ceremony of this machine will be this Tuesday afternoon, probably sometime around 5pm-ish, which is plenty of time for people to get acquainted with the machine & order some popcorn before the AGM starts. Available flavours for this machine’s introduction are original, cinema-style butter salt (yes I’ve tracked down and am using literally the same ingredients cinemas use), caramel, and chocolate. Except unlike cinema popcorn that’s often stale from sitting around (in fact most cinemas these days just buy bags of pre-popped popcorn that’s over a week old & laced with preservatives), this stuff is cooked fresh & hot just for you when you place your order, right in front of your very eyes! Fresh popcorn tastes so much better.

Prices have been set in line with the drinks machines - $3 for a single shot of flavour, or $3.50 if you’re daring enough to have a double-shot of extra flavour. This means for $5 you can get a drink & a light meal without having to even leave the hackerspace, or for $5.90 you can go fancy with an imported drink & a double-shot of extra flavour with your popcorn! :wink:

:popcorn: :popcorn: :popcorn: :popcorn: :popcorn: :popcorn: :popcorn: :popcorn: :popcorn: :popcorn:

So, just so people know what to expect - there’s literally over a dozen different settings & things I can change in this machine that I still need to calibrate to find their optimal values. I’ve got them set at something reasonably close right now, but there’s always room for improvement. Stuff like the position of the cup in the collection area, the amount of kernels dispensed per cup, the amount of flavour liquid dispensed for each individual flavour, the concentration of oil/butter/flavour/salt/etc for each flavour… Aka, lots of stuff I can fiddle with. Feedback is totally welcome, because I can’t buy & eat an entire cup of popcorn after every single time I change every single setting (no matter how much I wish I could :wink: ). Just make a note of the day, time & your specific order along with your feedback, so I’ll know if I’ve already changed the settings since then or not!

https://www.youtube.com/watch?v=yD9IRHhvJf8 (What the popping process looks like with the machine open so you can see how it all operates, in particular the clever moving flavour dispenser arm)

:popcorn: :popcorn: :popcorn: :popcorn: :popcorn: :popcorn: :popcorn: :popcorn: :popcorn: :popcorn:

Happy munching! :wink:

5 Likes

For those who were present at the space last Tuesday, there was a bit of a ceremony where I unveiled the machine, then cooked a batch of popcorn in debug mode with the machine open so everyone could see how it actually worked. Sales have been pretty good so far (in fact the change exchange keeps running out from people using it to buy popcorn!), and I’ve been making some tweaks to the settings based upon feedback from people.

There is some sad news though… Unfortunately, barely a few hours after its unveiling, a blockage formed in the silicone tube inside the peristaltic pump to the caramel flavour line. The pump kept pushing more flavour through until eventually the tube exploded. This created a rather sticky mess inside the machine too.

(The caramel flavour dispenser pump… So much gooey sticky mess everywhere, it also went down both tubes onto the mixer motor and flavour bottle too :frowning: )

(The caramel flavour tube - you can see the two blockages are visibly expanding the tube, and you can see the hole in the middle of them where it exploded)

I have a few ideas on how I can prevent this from happening in the future. I’m going to try implementing one of them at the space tonight, and hopefully I should have the caramel line up and running again pretty soon. :slight_smile:

2 Likes

I replaced/repaired all the damaged parts, cleaned up the mess, and re-blended the caramel flavour mixture. The end result is Caramel is available once again! The flavour is now much smoother and, in my opinion, tastes better with an improved mouthfeel. So far it’s proving more popular than I expected, so I’m going to need to mix up some more to meet the high demand for this flavour.

(remixing the caramel flavour mixture, bit by bit)

Unfortunately, after another week went past, another part on the machine failed… This time it was a welding fracture in the flavour mixer bottle assembly for the Butter Salt line. Gotta say, a welding fracture was not a failure mode I anticipated on this machine. o.o The parts were temporarily swapped with the chocolate line to get the butter salt up and running again. With the clever application of some food-safe epoxy, the flavour mixer was repaired and brought back online again. What’s more, I shuffled things around so now the Chocolate line is available not just as $3.50 double-shots, but also as a $3 single shot too - have at it, chocolate lovers! :wink:

I had some requests to know the ingredients in the specific flavours, so people with food allergies etc know which ones they can eat. I’ve tried hard to keep the flavours as low-allergen as I reasonably can, and some of the things may sound a little weird, but trust me that’s only because I’m actually telling you what’s in the food in trace amounts unlike most food you buy in Australia that doesn’t list every little thing :stuck_out_tongue: . Also, due to the way this machine works, there is an unlikely-but-still-there chance that a single drop of another flavour may fall into your bucket. If you’re super sensitive to trace amounts of any of these ingredients, grab a paper towel and wipe the nozzles up inside the serving area (or come get me and I will personally open the machine & vend it for you in a way that guarantees no contamination :slight_smile: ).

Plain - Corn Kernels and that’s literally it (not even any added oil).

Butter Salt - Corn Kernels, Canola Oil, Mor-Gold Plus (Partially Hydrogenated Soybean Oil, Hydrogenated Soybean Oil, Salt, Lecithin, TBHQ (stabiliser), Citric Acid, Beta Carotene (colour Orange #5 E160a)). Butter Salt (Salt, Tartrazine (colour Yellow #5 E102), Sunset Yellow FCF (colour Yellow #6 E110)). CONTAINS: SOY

Caramel - Corn Kernels, Canola Oil, Mor-Gold Plus (Partially Hydrogenated Soybean Oil, Hydrogenated Soybean Oil, Salt, Lecithin, TBHQ (stabiliser), Citric Acid, Beta Carotene (colour Orange #5 E160a)). Caramel Glaze (Sugar, Brown Sugar, Molasses, Soy Lecithin, Tartrazine (colour Yellow #5 E102), Allura Red AC (colour Red #40 E129), Brilliant Blue FCF (colour Blue #2 E133)). CONTAINS: SOY

Chocolate - Corn Kernels, Canola Oil, Mor-Gold Plus (Partially Hydrogenated Soybean Oil, Hydrogenated Soybean Oil, Salt, Lecithin, TBHQ (stabiliser), Citric Acid, Beta Carotene (colour Orange #5 E160a)). Chocolate Glaze (Sugar, Cocoa, Soy Lecithin). CONTAINS: SOY

One final thing - I’ve replaced one of the missing springs in the cup dispensing area, and bent various things into a better shape. This better positions the cups to collect the popcorn that falls into them and reduces waste, so the cups should now be extra full of popcorn. Enjoy! :slight_smile:

(A new spring helps position the cup thing… And bad rhyme is bad :stuck_out_tongue: )

1 Like

I noticed that the Chocolate line was just about to clog itself again - this time in a clog that would’ve happened before the fluid pump, not after it, so it wouldn’t have been quite so explosively messy had it occurred. This future clog has now been removed. I think the best course of action here is for me to just bleed all the flavour lines once a month to prevent this from happening again. In the process of doing this, I’m replacing some zip-ties with hose clamps for the areas I’ll have to access repeatedly, so I can work on them easier.

The caramel flavour has been so popular, I had to buy more ingredients to mix up more. There’s now a few litres of it in the machine which should last us a long time, so enjoy!


(Manufacturing caramel flavouring - one of the more delicious science experiments I’ve done in my life)

The amount of popcorn you get per cup appears to have dropped lately. I looked into this, and the answer is a little more complicated than most would think… It actually had the same number of popcorn kernels per cup, but their average size had shrunk, which is what made the cups seem less full. The short answer is that cooking popcorn in the fluffiest manner possible is a much more complicated topic than most people would realise and there’s all sorts of variables. The longer answer is that one of the biggest ones is the conditions the corn experienced when growing plus any processing by the manufacturer, and these are both out of my control. Another surprisingly big one is the moisture content of the kernels, and this can be influenced by all sorts of things, including humidity - even a 1% chance in moisture content can have a big impact in kernel size… And if you remember, we just had a week and a half of solid rainy days! At the end of the day, there’s not a huge lot I can do to control some of these variables. However, moving forward I plan to load less kernels in the machine’s storage hopper so they have less of a chance to be influenced by ambient humidity levels. If I come up with a good solution, I’d like to build a decent rubber seal around the storage hopper’s lid to better seal it - I have no idea yet how I’d effectively do this. And for now I’ve bumped up the number of kernels dispensed per cup by 10%, and if that’s still not enough to compensate it then I’ll bump it up further.

The style of the vended cups will be changed soon, from red & blue to yellow. They still hold the same volume per cup, but these new cups have a steeper taper with a smoother wax finish so they won’t stick together as much inside the machine. This means they won’t need those foam spacers the other ones have on them. (If you ever wondered why there was a piece of foam on the bottom of the cups, well now you know! :wink: )


(The new style of cups in the machine, ready to replace the old ones)

Finally, an important milestone was passed this week too - the machine dispensed its 100th cup! It’s hard to estimate for certain & I haven’t added all of the latest expenses to this number, but for a rough figure the machine has so far paid off around 15-20% of itself. Looks like I need to buy more corn kernels to keep the machine well stocked! :slight_smile: :popcorn:

2 Likes

The new yellow & red cups weren’t being dispensed properly from the popcorn machine - sometimes it wouldn’t dispense any cups, sometimes it’d dispense two cups, and sometimes it’d dispense a cup but it would get caught inside the machine & crushed. I’ve done a few things that should fix this. The first thing was removing the part that was occasionally crushing the cups - this was an anti-theft blocker that stopped people reaching up inside the machine & stealing the cups. I could’ve modified it to work better, but instead I opted to just cut it off - I don’t think cup theft is very likely given this machine’s current clientele. :wink:

(before, with the cup-blocking arm in place on the right)

(after, with it cut off)

Secondly, the gears that dispensed the cups needed replacing - there was only 4 in the machine not the 6 there should’ve been. And those four had been filed back so they would better dispense the older blue & red cups we used to have… but no longer dispense the red & yellow cups! So I measured the existing gear design, drew them up in Fusion 360, calculated the dimensions necessary to take both cup types (in a more reliable way too), then modify the model to improve upon the original design. You can check out the model of the new gear piece here. These were 3D printed, then filed to make the working surfaces nice and smooth.

(old gears on the left vs the 3D printed ones on the right - it’s hard to photograph white objects, but you can see that they’re almost identical)

It’s a particularly fiddly job to install all the gears in the planetary holder mechanism at once, but I somehow got them all in. I tested it and… Everything worked perfectly! It’s fantastic when a new design works right the first time. I did notice a few little ways I could’ve improve the design even more if I ever need to print some more, but for now these should do us just fine.

(new 3D printed cup dispensing gears in place, viewed from below)

(new 3D printed cup dispensing gears in place, viewed from above)

I test vended over 50 cups and every single one popped down perfectly. After bleeding all the flavour lines, I’m happy to announce that this machine is back in action! Here’s an animation of it working, played back at double-speed. From the three gears you can see how the planetary gears & worm drive all works from multiple angles.


(One by one, the cups are slowly separated & dispensed)

Get your hot fresh popcorn on. :popcorn: :popcorn: :popcorn:

3 Likes

It’s been a while since I updated this, but that doesn’t mean I haven’t been working on the machine. I’m sure I’m forgetting some things, but here’s a few of the things I remember!

For whatever reason, the caramel flavour bottle keeps spinning around and tying itself up in a knot. I’m not completely sure why it only happens to this one bottle and not the others, and why it only started happening now - my current working theory involves a wizard and an ancient curse. I tried untangling it, but it kept twisting itself up. So with the clever application of a piece of wood, I’ve managed to affix this bottle to the chocolate bottle to stop it spinning. This was definitely an unexpected malfunction!


(let’s not twist again, like it did last Summer)

I have a feeling that this machine is designed for far more frequent use than it gets at HSBNE. Part of this is that the flavour lines need to regularly run or else they drain a little. A one-way check valve may help here, but I’ll have to see if I can find food-safe ones at a reasonable price. For now, I can work around this by just manually bleeding the flavour lines once a month or so.

Also, we’ve sold enough cups of popcorn that I’ve had to load the machine up with more cups! I’ve also brought in my supply of additional cups and stashed them beside the popcorn machine - these are not to be used by anyone for any purposes no matter what, because these cups are very specifically made just for this machine and I may have difficulty acquiring additional ones (as in, I may have to pay to fly them over here from the US at a large expense). But hey, it’s good news that we’ve sold enough that the machine needed re-stocking!


(Lotsa popcorn cups. As these cups don’t have heads, they are not cupheads)

Finally, I’ve been working on increasing the fluffiness of the popcorn in the machine. Astute popcorn connoisseurs may have noticed that the average popped kernel size has decreased with time. There’s always person-to-person variance, but most people find that the fluffier & larger the popped kernels, the better the popcorn tastes. Taking kernel samples home with me to study & analyse, I’ve discovered that the kernels had absorbed too much moisture, likely from humidity in the air. There’s a sweet spot of moisture content to obtain maximum kernel expansion (and of course there’s multiple research papers into this topic, and of course I’ve read all of them :stuck_out_tongue_winking_eye: 
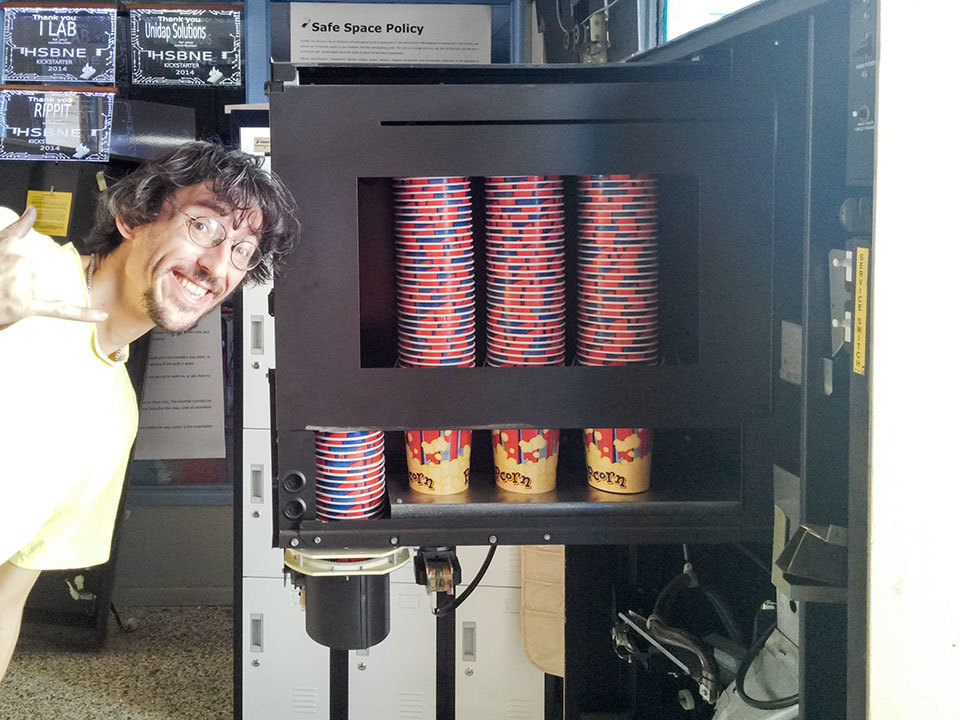
). The good news is that I’ve been able to reverse this process to “refresh” the kernels through the clever application of large quantities of silica gel. Based upon my measurements, I’ve now increased the popped kernel volume by a good 30-40%! So much so that I’ve had to adjust some values inside the machine to reduce the amount of spillage from the cups overflowing with popped popcorn. To help prevent this in the future I’m reducing the amount of kernels stored in the hopper as much as I can, plus there’s now a 100g silica gel packet placed in the hopper (and I’ll monitor that packet’s weight to measure the kernel moisture content), and I’ve attempted to create a bit more of an airtight seal on the lid (but not 100% air tight because that would just create more problems as the air pressure varies). We’ll see how well this works in the long-term.


(pro tip: wrapping a lid in cling wrap makes for a good DIY seal)

The popcorn dispensed by this machine should now be notably better than before. Munch on! :popcorn:

1 Like

First, the disappointing news. I don’t know exactly when but going by my best rough estimates, some time around midday on Friday the 26th of January some incredibly unthinking member unplugged the popcorn machine and I only discovered it when I arrived the following Tuesday. This is a problem because if it’s left unplugged the mixers in the flavour bottles won’t run at scheduled intervals, the flavours will all settle in the bottles, and I have to spend over an hour pulling the bottles out, draining the tubing, removing half the tubing, mixing the flavours up again, reinstalling everything and priming it all. Because this has happened before I’d already taken steps to prevent it from happening again - someone had to pull the power board out from where it was hidden, ignore my name written on the meter, then untape the plug and unplug it. At this point I’m honestly at a loss for what more I could physically do to prevent it from happening again. At any rate, I’ve sorted the machine out & plugged it back in, plus I’ve physically written on the tape as well this time because I really don’t know what else I can do. So thank you, unthinking member - you wasted over an hour of my time. :angry:


(Important note: if you have to dig out the hidden power cord for something and find another member’s name on it, the plug physically taped up, and DO NOT REMOVE written on it, don’t freakin’ remove the tape and unplug it. Seriously.)

Now for the happier news - news of progress! Going by the limited information I have available to me, by my best guess there was originally one-way valves on the tubing just exiting the flavour dispenser bottles. These are necessary to guarantee the amount of flavour liquid dispensed per vend will always be the same volume - right now it’s sometimes more, sometimes less. I’ve been buying and trying out different check valves but so far I haven’t discovered one that ticks all the boxes to be A) made of food-grade materials, B) is also chemically inert to the flavour liquids, C) can handle a thick liquid with a comparatively gritty salt/sugar content held in a suspension without either seizing up or getting stuck open, and D) isn’t $100 apiece. It turns out that wanting those four things simultaneously is a bit of a difficult ask. I’m working on it though, and there’s still a few avenues I haven’t explored yet. If someone has any leads I’m all ears!


(A variety of one-way valves I’ve tested, none of which met all of the requirements at once)

I instantly thought of those lanced-boil / silicone nipple things they have on honey and sauce bottles - no idea how long before they start failing or if they restrict flow too much but if you turned up a mount for them they could be easily replaced, they seem cheap enough: https://www.alibaba.com/product-detail/FDA-SGS-approved-squeeze-bottle-cap_60565545215.html